
0
Views

Step-by-step instructions for all popular types of decor.
If there is debate about the need to install ceiling skirting boards, then there is no way to do without floor skirting boards. In addition to a purely decorative function, they are needed to cover the junction of the wall and floor, as well as to lay communications and protect the coating from moisture during cleaning.
If you do not take into account the color, texture and design of the skirting boards, the most important difference is the material. The elements are made from plastic, MDF, duropolymer, and also from solid wood. Each variety has its own characteristics.
Plastic skirting boards are the most common option. They are made from polyvinyl chloride and are popular not only because of their affordable price, but also because of the large number of colors, designs and flexibility. Thanks to it, elements can be installed even on the most crooked walls without gaps.
Such skirting boards are wear-resistant, not afraid of moisture and can be easily mounted using self-tapping screws or dowel-nails. To connect the parts together, special angles, joints and ends are used. Best suited to laminate and
linoleum.A more expensive option is skirting boards made from wood fibers of a fine dispersion fraction or simply compressed sawdust impregnated with resins, covered with a film with a special protective layer. They differ in shapes and sizes, look more expensive and more interesting. There are options with a paintable coating.
MDF plinth exactly replicates the appearance of natural wood of various species, but is inferior to it in strength and is afraid of moisture. It is more difficult to install such material - the elements need to be sawed at an angle for joining. At the same time, the floors and walls must be perfectly smooth, otherwise unsightly cracks will appear. They are installed on special mounts, but it is better and more reliable to place them on glue.
Modern skirting boards made of extruded polystyrene foam are high-density, are not afraid of moisture and are produced in a wide variety of profiles. The material must be painted, so the element can be given any color to suit the desired design.
The decor is attached to the wall with glue. The elements are cut on a miter saw to form joints and corners, and then joined together. It bends slightly, but also requires good wall preparation and gender.
A classic version of skirting boards, which is made from solid wood and is ideal for parquet, boards and other natural materials. There are both the most affordable models made of pine, as well as expensive and high-quality options made from valuable wood species.
Such skirting boards are environmentally friendly, have an attractive appearance and high strength, but are afraid of moisture and temperature changes. Special clips, glue, as well as screws, dowels and even nails are used as fasteners.
You have to decide on the decorative component and design yourself. According to the classical concept, the plinth is a continuation door platband, so it must be the same color. At the same time, the option of finishing under flooring is often found.
In order not to get tired during installation, it is important to consider how smooth the walls and floor are in the room. If this characteristic leaves much to be desired, then you should not choose wooden and MDF skirting boards - it will be impossible to install them without nasty cracks. In such cases, it is better to take flexible plastic elements with a silicone edge or duropolymer products.
In addition, it is worth realistically assessing your strengths. If you have no experience in repairs and carpentry work, as well as the corresponding tools, in particular a miter saw, it is better to focus on PVC or simple wooden options. They can be installed with a minimum amount of skills and tools. But you shouldn’t take on MDF and duropolymer.
The standard length of the plinth is 2.5 m. This means that to calculate the required amount of material you need to measure the length of all walls minus the width of the doorways and divide by the length of one element, then round up to whole number.
For example, for a room 3.5 m × 5 m with a door 80 cm, you will need 7 slats 2.5 m long: (3,5 + 5 + 3,5 + 5 – 0,8) / 2,5 = 6,48 ≈ 7.
If the plinth has fittings (internal and external corners, connections, ends), as, for example, on plastic decor, do not forget to count their number.
All parts of the plinth are installed one after another and pressed tightly against each other to avoid gaps. They start, as a rule, from one of the internal corners and sequentially move towards the doorway frame, and then in the other direction from the same point.
To start, it is best to take the longest wall. If you suddenly cut a part incorrectly, it will not be thrown away - it can be used for a shorter surface.
The plinth is mounted exclusively on the wall. This way it holds better and presses against the floor covering, further securing it. When using self-tapping screws and dowels, you can attach elements directly on top wallpaper. But when installing with glue, the base must be strong and primed, so the wallpaper in the baseboard area should be carefully cut off or glued afterwards.
It all depends on the type of plinth and wall material. Essentially, there are three options: these are self-tapping screws (or dowels), glue (acrylic, polyurethane or liquid nails) and special clips provided by the manufacturer. The last method is the most inconvenient, so many masters completely ignore it, preferring to use more reliable dowels in the case of plastic and wooden elements and special polyurethane adhesives for skirting boards made of MDF and duropolymer.
You can fix the planks either one at a time during the work, or all at once after preparation and trimming. Professionals often use the latter option.
When attaching the plinth to the wall using self-tapping screws, dowels and nails, it is important to make sure that there are no electrical cables, water supply and heating pipes, as well as other communications in this place. Otherwise, they can be damaged, and repairs will be delayed.
The simplest option, which you can safely tackle on your own if you have minimal experience in repairs or a desire to delve into the process.
Start installation from the inside corner. Place a piece of fittings with a corner onto one of the slats and try it on against the wall.
If the wall is long and the entire plinth fits, you can immediately attach it. Otherwise, measure the required length with a tape measure or simply make a mark with a pencil if there is an outer corner.
Carefully cut off the baseboard using a hacksaw along the mark. If it is equipped with soft silicone edges, first cut them with a sharp knife so that the tool blade does not leave torn edges.
Remove the cable channel plug and the upper part of the baseboard. Place it in place and attach it to the wall, pressing the strip to the floor so that there are no gaps. If the wall is made of plasterboard or wood, then simply fasten it with self-tapping screws; if it is made of concrete or brick, then with dowels - you can drill directly through the baseboard. The fastener pitch is about 50 cm.
Place the plug in place by inserting it into the corner and pushing it all the way, and then snap it into place along its entire length.
Continue installation by joining the slats using connecting elements. In order not to be mistaken with the size, remember that the plinth extends into them by 5 mm on each side.
To cut planks to size between two walls, install internal corners, measure the distance between them and add 10 mm. To install the plug, insert it on one side, then on the other, and then click the free middle.
When framing an outer corner, insert the guide hardware and attach it to the wall. Then put the inner corner on the plank, try it in place and make a mark with a pencil along the border of the outer corner of the wall.
The final touch is the installation of endings or caps at door frames, built-in cabinets and other similar places. Don’t forget to screw the screws into the corresponding mounting lugs so that the fittings do not fly off during cleaning or accidentally touching them with your foot.
If anything remains unclear, watch the video instructions.
An installation option that is average in complexity, which nevertheless does not require special tools and can be done by anyone who is familiar with repair work.
If you plan to paint or varnish the baseboards, it is better to do this before installation. Although if the floor covering has not yet been treated, then sometimes it makes sense to paint or varnish everything at once after installation.
First, you should adjust all the skirting boards in length and at the corners, and then attach the elements to the wall. Starting at one of the inside corners, use a miter saw or miter box to cut two strips of baseboard at a 45° angle from back to front, each in a different direction. Try it on on the spot.
If the baseboard rests on a corner and gaps form along the walls, use a sharp knife to lightly trim the wood at the ends of the planks on the inside.

1 / 0
Frame: Vitaly Tikhonov / YouTube

2 / 0
Frame: Vitaly Tikhonov / YouTube

3 / 0
Frame: Vitaly Tikhonov / YouTube
To join skirting boards together on long walls, if you have a miter saw, cut the elements not at 90°, but at 45° in the same direction. This will make the connection almost seamless. If you only have a regular hacksaw at hand, try to cut as accurately as possible at a right angle, and fill any gaps with putty.
External corners are adjusted according to the same principle as internal ones, only in reverse: at an angle of 45° from the most protruding part from the front, front surface, towards the rear.

1 / 0
Frame: Vitaly Tikhonov / YouTube
2 / 0
Frame: Vitaly Tikhonov / YouTube
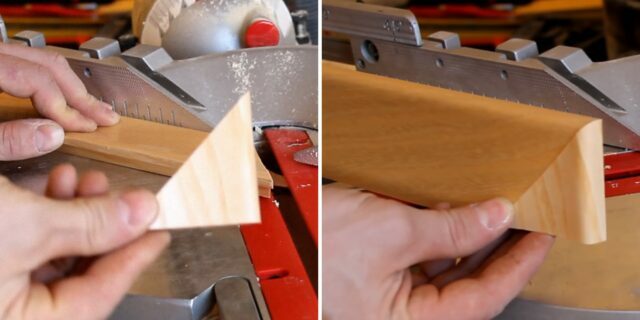
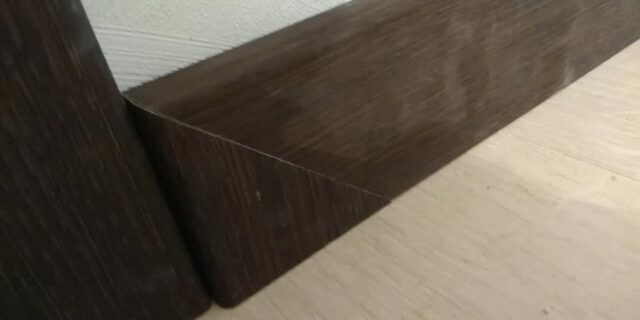
Joining the plinth to the platband doors You can simply do it at 90° if you don’t mind the visible cut edge. Or act like this: saw off the strip at 45° to get a small triangle, then saw off the plinth again at 45°, but in the other direction. As a result, the triangle will aesthetically merge with the main part.
When all the planks are ready, attach them to the walls using foam adhesive, self-tapping screws or finishing nails. When using the last two fasteners, maintain a spacing of 40–60 cm. Mount the parts sequentially, pressing one against the other so that there are no gaps.
Cover holes from self-tapping screws, nails, as well as possible cracks or flaws with wood putty and remove excess with a napkin.
More details in the video:
Both options are almost identical in installation, with the possible exception of adhesives. And both are complex. You will need a miter saw for a clear cut at an angle, as well as dexterity and experience. You should take on work on your own if you have confidence in your abilities or are willing to turn a blind eye to inevitable flaws.
If you have a plinth made of duropolymer for painting, then it is more correct and much more convenient to give the element the desired color before installation.
Start at an inside corner on one of the long walls. If it is plastered exactly at 90°, then take two strips of plinth, cut them at 45° on a miter saw or in a miter box and join them together.
If the angle is more or less than 90°, you should mark the joining of the parts in place. To do this, place the baseboards one by one and draw their lower and upper edges on the floor with a pencil.
Use the resulting crosshair as a sight and, having pushed the strips completely into the corner, mark a sawing line on them. Thanks to this, regardless of the curvature of the corners, the connection will be as precise as possible.
Use a miter saw to make cuts according to the marks. If it is not there, then use a regular hacksaw with a fine tooth, but proceed with extreme caution. For angles of 45° and 90°, you can use a miter box, but the “wrong” ones will have to be cut by eye. In order not to damage the film on the end of the MDF baseboard, it is convenient to stick masking tape on top and saw along it.
For external corners, the algorithm is the same: alternately apply strips on one and the other side of the corner, and then trace them along the bottom with a pencil to determine the place of convergence and get the crosshairs exactly in him. Also mark the top of the plinth on the wall so that you can then connect the dots and get a cutting line.
First, saw off the first strip, butt one end to the previous piece of baseboard, and then make marks on the second piece of the outer corner. If its length is sufficient to the next corner, trim there and only then mark and saw off the second end of the plank at the outer corner.
For a tighter fit, you can cut off the inner parts of the plinth with a sharp knife so that they do not rest against each other and the parts fit together without gaps.
Continue measuring and cutting the baseboard strips to size, creating the joints. Follow the principle of consistency: cut off the second end of the part only after the first has been fitted to the previous part.
To join planks together on long straight walls, it is better to end them not at 90°, but at 45° - this way the joint will not be noticeable at all. In addition, when one part is superimposed on another, the gluing area increases and, accordingly, the reliability of the connection.

1 / 0
Shot: Andrey Ovcharenko / YouTube
2 / 0
Shot: Andrey Ovcharenko / YouTube
To beautifully join the baseboard to the door trim, saw off the last strip to size, and then cut it at an angle of 45° back. Using another piece of baseboard, make a triangle to fill the void. To do this, first saw off the oblique part at an angle of 45°, and then cut the resulting part at an angle of 90°. After joining, the parts will fit together perfectly.
When all the pieces of plinth are prepared and adjusted to each other, all that remains is to attach them to the wall using suitable glue. To do this, carefully apply two continuous strips of the composition, stepping back 10–15 mm from the edges, and then firmly press the parts against the wall and hold for a while to fix. For greater strength, glue them together.
If the walls are uneven, you can get rid of the cracks if you immediately press the plinth firmly. Here's one of the simplest ways: stick a strip of adhesive tape on the floor, put some kind of block on top and wrap the free end of the tape up. After this, attach the second strip on top, fixing one edge of the stop, and press the part to the surface with it.
If the walls are too crooked, then you can completely remove the cracks only by covering them with sealant that matches the color of the wall or baseboard. Apply silicone to the edge of the putty knife and carefully fill the gaps.
If you need more details, watch the video below.
Save on a master👨🔧
Read also🧐