You already know what your camera is capable of? Not? Then the article is useful to you. In it are five tasks that help to understand the camera and understand how it works. Interpretation of the results are given in the end of the article, but most findings you will need to come on their own. Try to analyze the behavior of the camera yourself. Do not look!
To perform all actions necessary to manually adjust the sensitivity range, aperture, shutter speed and white balance.
1. Play with depth of field by using a diaphragm
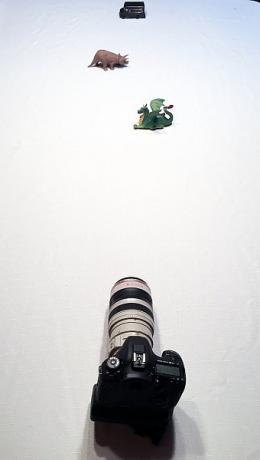
The first task is simple. Put on the table in front of the lens three objects. Choose items that are easy to focus (with lots of lines and contrasts). For example, children's toys.
The camera will not move, so set it on a table. The first object is put right in front of the camera, at a distance of about 60 cm. The second object should be 30 cm on the third - on another 30 cm. Objects need to be arranged in a staggered manner, to fall within the field angle of the lens. The result should look something like this.

Set the camera's aperture-priority mode. You do not know how to do it? Look in the manual. Typically, such a regime is hiding behind the designation A or Av on the main dial. Then set automatically (Auto) ISO sensitivity value. The camera will focus on the central point. However, the focus point of all cameras are selected in different ways, and if your not in focus at the center, will have to climb in the instructions again.
Point the camera at the first object that he was out of focus. Set the minimum aperture value, which allows your camera (e.g., f / 1.8 or f / 3.5). If you are using a zoom lens, set the focal length in the range of 40-60 mm.
Take a picture. Without moving the camera, change the aperture f / 8. Take another picture. Then set the maximum value (minimum aperture), for example, f / 22 or higher. Take a picture.
Then set the focus point on the second object, it becomes sharp. And repeat three shots with different apertures, from minimum to maximum.
Finally, focus on the second object, and again take three photos.
Total you should get nine shots, three for each subject in focus, with different apertures.
Aperture controls the depth of field. What changes when you set a larger aperture? More or fewer objects into focus? What happens when you are on the same apertures focusing on near or distant objects? What is the focus?
Bonus experiment: repeat setting the focal length to the minimum value in the region of 18 mm. Vote difference.
2. exposure compensation
It's a shame to buy a brand new camera and to discover that far from ideal automatic settings. As a rule, use automatic tuning in general not necessary. It is not too difficult, and you may well be able to deal with all this parsley.
To set, select the two objects. One - completely black, the other - completely white. Put them close to each other. In the example of picture used for Case iPad and towel.

Set the aperture priority mode, and select its lowest value. Set the ISO sensitivity value of 400 and turn autofocus. See how metering is set in your camera, and select center-weighted or spot.
Install the camera in a stable position, focus central point on the black to measurement performed for this property. If using center-weighted mode, try to fill in the black all metering field. Take a picture.
Now find the exposure compensation function. It can be designated characters - / +.
Now you need to change the settings and underexpose the picture one step. If you work, then this will be indicated on the display as -1. If your camera model uses a coordinate axis, the pointer will move to the 1 position to the left of zero. In general, determine how you indicated a change of exposure, and make one more photo.
Return the exposure compensation value to zero and focus the camera on a white object. Take a picture. Then, change the value of the compensation to +1.
You should have four photos. Look at pictures of the black object. In what photo the color of the object is closer to reality? What about white?
3. Test sensitivity range
In modern cameras with a wide range of sensitivity, but everything has a border. We do not deceive yourself that when shooting in a dark room with a value of ISO 6400 all by itself will turn out fine. The following task shows that changes along with the ISO value and what individual limitations of your camera.
Put one end of the table a few objects, and camera are on the other. Zoom in so that the objects are completely filled lens. Well, if the frame will be white, black and colored objects. For normal levels of lighting including lamps, if necessary. Turn off the flash.
Set the aperture priority mode, and aperture set at f / 5.6. Set the ISO sensitivity value to 100 and take a picture. Trying not to move the camera, move the ISO setting to 200 and take another photo. Then make images at values ISO 400, 800 and so on (each time double the sensitivity value), as far enough camera features.
Rate photos, best on the big screen. When viewing images on the camera's monitor screen, use the zoom when you look at the dark objects. What changes gives each change settings? Do you notice a difference in the look of the white and black objects?
4. Add blur effect using low shutter speed
This problem is solved by a simple and fast. You may need an assistant, you can also go out and capture moving machines. You need an object that moves in the cameras field of view on the one hand to the other (rather than forward or backward) at an approximately constant speed.
Put the camera on a stationary surface or on a tripod contrast of moving objects. Set the shutter priority mode (indicated by the letters S or Tv), the sensitivity value ISO - 100, shutter speed - 1/500.

Take a picture of objects passing in front of the camera. Then adjust the Shutter Speed 1/60 to take another picture of moving objects.
Finally, set the shutter speed to 1/10.
What differences do you see between the three photo?
5. Important white balance
White balance is important if you save images in JPEG format. Typically, cameras and expose themselves good white balance, but it would be nice to know how to manage these settings manually if your camera promahnotsya.
You need a place with three different light sources. Never mind if these sources are not there, you can navigate with your camera. And yet you need a piece of white paper with the inscription (for focusing).
Install a programmable mode. This will allow the automatic setting the shutter speed, aperture, and ISO sensitivity, but to control the white balance. Again, we are talking about the most common settings, but each manufacturer's implementation of this regime may be different.
Find a place with natural light. Set the white balance mode "Daylight." Usually it is indicated by an icon of the sun. Take a picture of a white sheet with drops on it by daylight (even if the day is cloudy).
Trying not to move away from the shooting point, move the white balance mode "Tungsten", which, in fact, indicated by the icon lamp. Repeat the previous photo. Finally, set the mode of "Shadow" (little house icon). Again, take a picture.

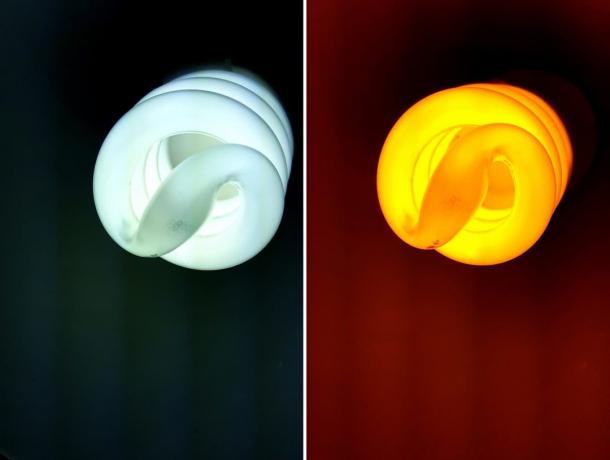
Then, go to the source of artificial light: fluorescent lamp or incandescent lamp. You will again have to take three photos of the white sheet with different white balance settings as the previous time. Make sure that light from the source incident on the sheet, and does not pass therethrough.
What happened to the white color of the leaves on each of the images? White is different, right? What becomes the color when shooting in "shadow" mode: yellow or blue? Now you clearly how it works. Use.
Answers and Tips
Excellent played, now it's time to understand that you need to be seen in the performance of each exercise.
- In the first exercise should be seen more objects of focus with increasing aperture. When you focus on objects that are farther away from the camera, depth of field also increases with the size of the aperture.
- Your camera automatically sets the exposure so that the world is 18% of gray. This means that black and white objects will become gray. If you shoot something gray, for example, asphalt, additional settings are required. But to bleach white, you need to overexpose a shot, and to blacken the black - underexpose.
- When increasing the sensitivity, digital noise (not the same as the grain on the film, but similar) is growing. Noises are rarely needed, and as technologies improve camera manufacturers learn to fix this problem. Therefore, even five years ago, photographers are not advised to install the ISO sensitivity above 800. Now you can shoot with ISO 2000 with an adequate result. But each camera its limits, which are empirically.
- The slower the shutter closes, the more the picture blur. It may appear from the fact that you move the camera, or the fact that the subject is moving. This effect is not always bad, with it you can make stunning images. But we need to be able to dispense it. So experiment with shooting at different shutter speeds.
- White balance is hard to find when there are many different light sources, but this option helps to adjust the colors in the photo. Artificial light gives yellow or green shades, shade and cloudy weather makes bluish pictures. If you want to change the colors in the photo, try to work with the white balance settings.
A distinctive feature of photographing - this is an opportunity to repeat. You make a photo, and then do it again. If you follow the changes, the experiments will help to save a great experience. Change only one setting - and the result looks quite different.
Next, experiment. The more will be removed and it becomes more likely to look at the world through the lens, so learn more.


