
19
Views


Ivan Zarubin
IT-specialist, DIY-startups.
I will not paint all the benefits and all the features of 3D-printing, say simply that it is a very useful thing in the home. Sometimes nice to know that you yourself can create a variety of objects and repair technique that uses plastic mechanisms, various gears, fasteners ...
Ever wanted to make it clear - why do not buy Chinese deshmansky printer for 15 thousand rubles.
They usually come with acrylic or plywood enclosures, printing details with the printer will turn to a constant struggle with body rigidity, calibrations and other events that darken the beauty of ownership printer.
Acrylic and wooden frame is very flexible and light, when printing at high speeds them seriously sausages, due to which the quality of the finished parts is poor.
Owners of such frames often KOLHOZEN different amps / seals and constantly make changes to design, thereby killing the time and mood to engage in precisely the press, rather than refining printer.
The steel frame gives it the opportunity to enjoy the creation of components, rather than struggle with the printer.
Following my little guide, you will order too much and did not sleep my first electronics kit, as I did. Although it is not so bad: the cost of consumables and spare parts to it a cheap printer.
Guide is intended primarily for beginners, the guru of 3D-printing, most likely will not find here anything new. But those who would like to join, after the assembly of the kit will be clearly understood that to anything. It does not require special skills or tools, enough soldering iron, set of screwdrivers and hexagon.
Cost of components relevant to January 2017.
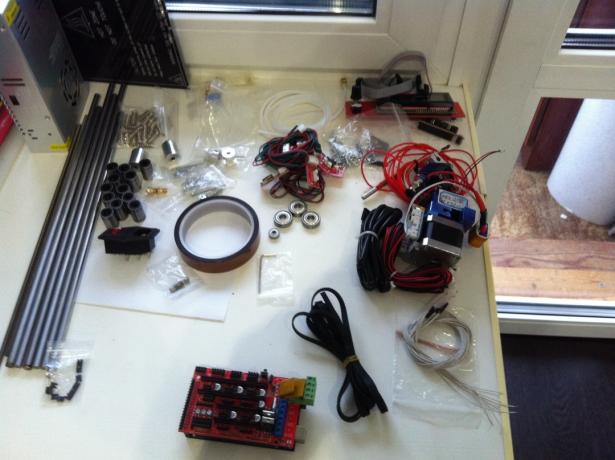
1. The basis for the printer - frame than it is harder and harder, the better. Heavy and sturdy frame will not kolbasit when printing at higher speeds and quality parts will remain acceptable.
My choice fell on a steel frame of Russian manufacturer.
Cost: 4900 rubles apiece.
The frame comes with all the necessary mounting hardware. Cogs and gaechek guys put with a margin.
2. The guide shafts and M5 stud. Threaded rods and guide shafts not come with a frame, but the image they are.
Cost: 2850 rubles per set.
Perhaps you find and cheaper. If you're looking for, be sure to choose a polished, otherwise all the schools of the shaft will be reflected on the details and overall quality.
Cost: 200 rubles apiece.
It is, in fact, conventional studs, which can be purchased at the hardware store. The main thing that they were as much as possible smooth. Check is simple: you need to put a pin on the window and rolled it on the glass, the better the rides, the smoother the hairpin. Shafts checked by appropriate means.
In general, the more we do not need anything from the store, because there is a wild margin for the same that can be purchased from the Chinese.
3.Set RAMPS 1.4 + Arduino Mega 2560 R3 + stepper drivers A4988.
The cost: 1045 rubles.
RAMPS 1.4 - extension board for Arduino. That is all the electronics, engine drivers are inserted in it is connected to it. For all the power of the printer she says. It has no brain, burn and break it is nothing, a spare, you can not take it.
Arduino Mega 2560 R3 - the brain of our printer, on which we will fill firmware. Advise take spare: inexperienced it easy to burn, for example by inserting the wrong driver stepping motor or reversed polarity when connecting a trailer. Many are faced with this, and I'm including. That you may not have to wait weeks for a new, more just take at least one.
Stepping A4988 drivers are responsible for the operation of motors, it is desirable to acquire another set of spare. They have a resistor-built, do not twist it, perhaps he had already put up the necessary current!
Cost: 679 rubles apiece.
Cost: 48 rubles apiece.
4.step-down voltage regulator.
Cost: 75 rubles apiece.
It is necessary for the protection of our Arduino. It has a step-down regulator with a 12V to 5V, but it is extremely moody, strongly heated and quickly dies.
5.Set of stepper motors.
The cost: 2490 rubles.
Includes 5 pieces, we need only 4. You can search for a set of four, but I took the whole set, let it be one spare. It can be put on the upgrade and make a second extruder to print support a second extruder or two-tone details.
6.Set of belts, bearings and couplings.
The cost: 769 rubles.
This kit has everything you need for your printer.
7.mechanical stops - need 3 pieces.
Cost: 23 rubles apiece.
Take just in case 4 pieces, even if one is a spare. The cost of a cheap, and without such fine detail print will not turn (suddenly comes defective).
8.Display with built-in card reader.
Cost: 501 rubles apiece.
In the rear part there is a card reader, which in the future you insert a memory card for printing models. You can take one spare if you properly connect an element, it is likely to die the very first screen.
If you plan to connect the printer directly to a computer and print from a computer, the screen is not required at all, printing can be done without it. But, as experience has shown, with SD-card is more convenient to print: the printer is not connected to the computer, it can be place even in another room without fear that the computer hangs or you have it accidentally cut down the middle Print.
9.The power supply (12 V).
Cost: 1493 rubles apiece.
This power unit is slightly larger in size than the one that should be, but he easily breaks, and power it with a reserve.
10.hot table.
Cost: 448 rubles apiece.
Is required for printing ABS-plastic. Print PLA and other types of plastic, do not shrink when cooled, it is possible to print not heating the platform, but the table is required, glass is put on it.
11.Button and the terminal (220).
Cost: 99 rubles apiece.
12.extruder.
Cost: 2795 rubles apiece.
This extruder is a direct extruder, i.e. the feed mechanism is of plastic directly prior to the heating element. I advise to take exactly as it will allow you to print all kinds of plastic without much straining. Included is everything you need.
13.Cooler blower parts.
Cost: 124 rubles apiece.
Actually, you need to blow PLA and other types of plastic slowly solidifying.
14.Cooler blowing drivers.
Cost: 204 rubles apiece.
It is very necessary. Larger cooler will significantly reduce the noise from the printer.

15.spare nozzle.
Cost: 17 rubles apiece.
When clogged nozzles easier to change than clean. Pay attention to the diameter of the hole. Alternatively, you can collect various diameters and choose for themselves. I chose to stay at 0.3 mm, the quality of the parts with the nozzle is enough for me. If it does not play a special role, take the nozzle is wider, for example 0.4 mm. Printing is much faster, but the layers will be more noticeable. Take several.
16.Drill for cleaning nozzle.
Cost: 31 rubles apiece.
Its very easy to break off, be careful. The drill can not take it: it is easier, as I wrote above, the type of spare nozzles and change them. They cost a penny, and clogged rarely - when using a normal plastic, and in the presence of the filter, which you will print and the first thing.
17.Set of springs for the table.
Cost: 56 rubles apiece.
Included pieces 5, 4 for use of the table, to use a spring-loaded restrictor axis X.
18.Set for adjustment of the table. Need 2 sets.
The cost 36 rubles.
These kits we only need for long bolts, which we shall henceforth be fixed extruder.
19.Cable kit for connection of stepper motors.
The cost: 128 rubles.
20. A piece of ordinary glass on the table.
You can order a borosilicate glass that can withstand high temperatures. I use ordinary window glass: heating to 90 degrees, it can withstand, and the more I do not.
That's all you need for a printer assembly.
Quality printed pieces with the kit will be almost the same as those expensive brands of printers. It all depends on further settings, select the desired temperature and other nuances with which you will be introduced during the printing process. Advantage of the printer, as compared to the expensive brand-name, I believe the ability to quickly, cheaply, and to repair any part, without spending money and nerves.
The cost of such a set - up to 20 thousand rubles.
If you buy a printer as a whole, its value now stands at 43,900 rubles.
Ordering a snap-on AliExpress, we will save about 24 thousand rubles for the same components, and the extruder, which we picked up, even better in some respects.
Well, then start the process of assembling a fascinating follow official instructions.
Instructions →
mirror →

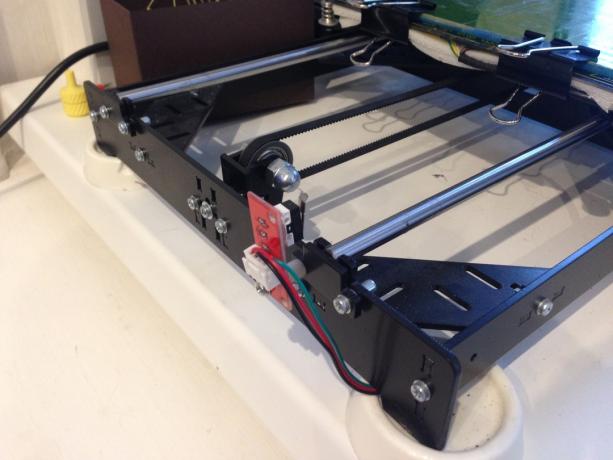
The assembly process quite fascinating and is somewhat reminiscent of the Soviet assembly of metal designer.
In paragraph 1.1, at the end, where are fixed end support, not our bearings 625z - however, we did not order them. Lead screws leave in "free floating" in the top position, it will save us from the effects of so-called speed wobble.

In paragraph 1.4 on the black image is present spacer. Included with the frame it does not exist, instead of it going plastic sleeve, use them.
In paragraph 1.6 the holder trailer Y axis is not fastened to the rear and to the front of the printer. If this is not done, the details are printed mirror. No matter how I tried to win it in the firmware, I could not.
To do this, soldering terminal on the back of the card:
In paragraph 2.4 we have a different extruder, but it is fixed in the same way. This requires long bolts, we take them from the kit to adjust the table (18 th position in the list). In a set with the frame there are no long bolts, as well as in local stores.

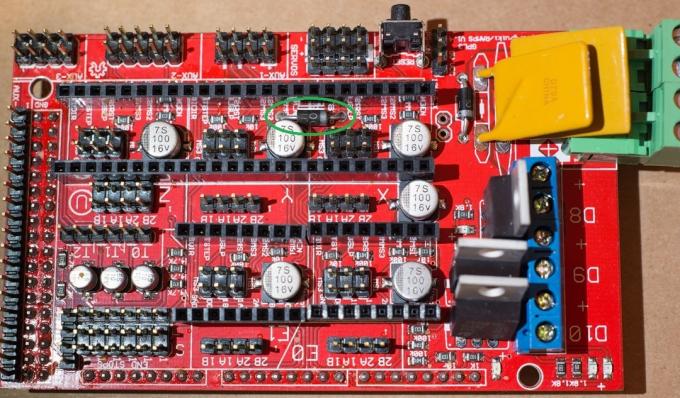
In paragraph 2.6, we begin to build our "sandwich" of Arduino and RAMPS and immediately made a very important revision, about which rarely write in the manual, but which is nevertheless very important for the continued smooth operation printer.
We need to decouple our Arduino from the power that comes with the RAMPS board. To do this, desoldering or cut diode RAMPS board.
Solder the voltage regulator to the input power, which is well in advance to expose 5, passing vypaivaya standard power socket. Glue to whom much easier to control, I stuck to the back of most Arduino.
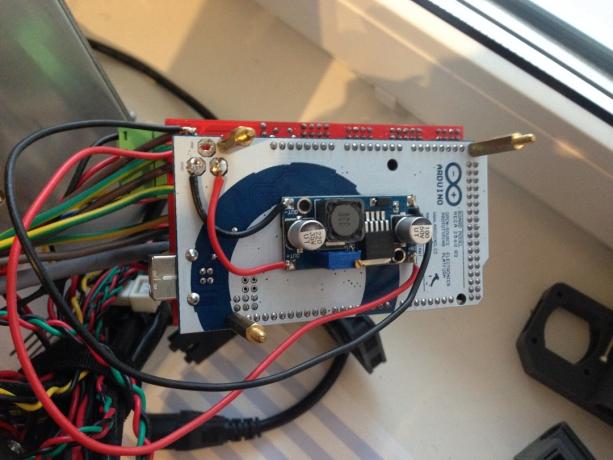
Power from the power supply to the RAMPS I soldered separately to the legs, to leave a free terminal for connecting other devices.
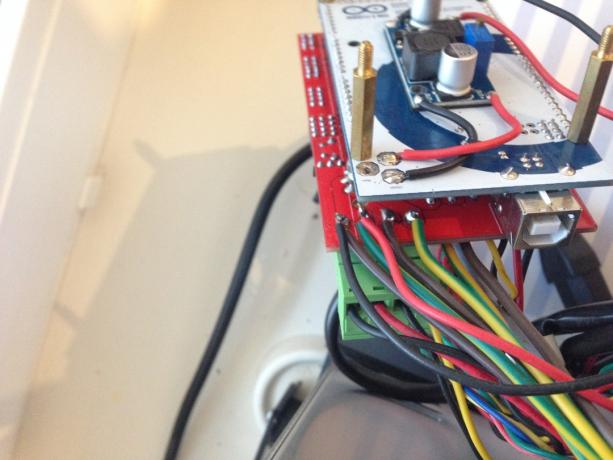
Next we stack all the wires. You can buy a special braid can, like I did, use electrical tape or tie.
Before starting check that nothing anywhere is jammed, the carriage moves to stop and back without obstruction. At first, everything will be tight to move, eventually bearing pritrutsya and everything goes smoothly. Do not forget to lubricate the guides and pins. I grease with silicone grease.
Once again, look, that nowhere nothing Koroto, stepper motor drivers delivered correctly according to the instructions, or burn and the screen, and the Arduino. Limiters also need to put the correct polarity, otherwise the burn voltage regulator on the Arduino.


If everything is connected correctly, you can skip to the instruction manual.
Instructions →
mirror →
Fill the firmware via the IDE Arduino 1.0.6, select Auto Home on the printer screen, make sure to connect the limit switches and the correct polarity shagovikov. If you move in the opposite direction, just turn the motor at the terminal by 180 degrees. If, after the start of motion is heard nasty squeak, squeak it shagovikov drivers. It is necessary to twist them trimmer according instructions.
I advise you to start typing of PLA-plastic: it is not capricious and adheres well to the blue tape, which is sold in DIY stores.
I take a plastic company Bestfilament. REC took a firm, but I did not like the layers lie. There is still a sea of different brands and types of plastic from the rubber to the "wooden", from transparent to metallised... Another company that I recommend, - Filamentarno. Their tents and excellent color own kind of plastic with excellent properties.
Plastic ABS and HIPS I type Kapton adhesive tape, plastered conventional glue-pencil stationery from the store. Such a method is good because there is no smell. There are many other different ways to improve the adhesion of the components to the table, you will learn about yourself in the process of trial and error. Everything is achieved by experience, and everyone chooses his own way.
Printed mount extruder E3D V6, printed some time this extruder with Bowden-feed. But he returned back to the MK10.
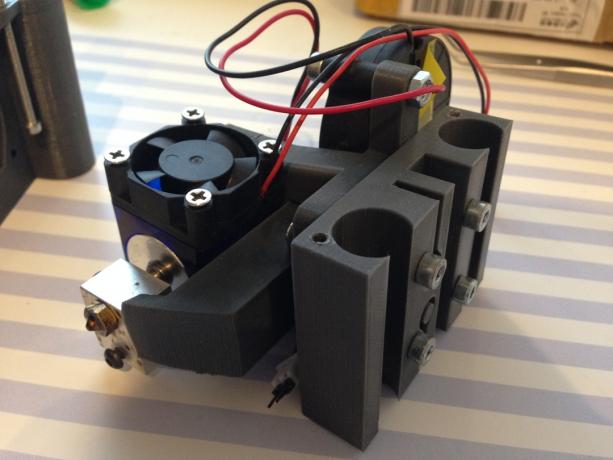
Bought here such an upgrade in the future will print two plastics.

Insulate the table for faster warm-up: a substrate with a reflective layer and a foiled adhesive backed. The two layers.

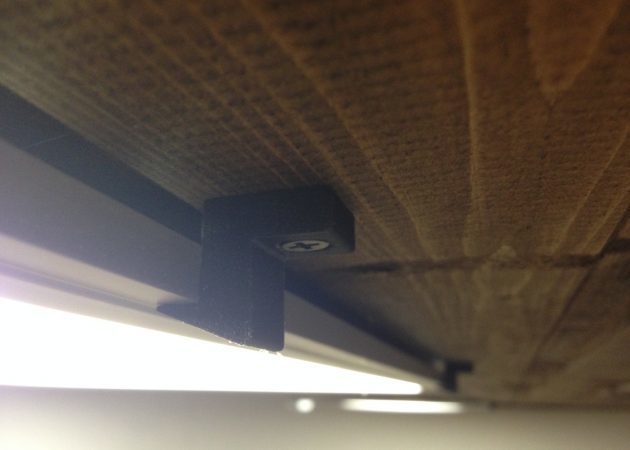
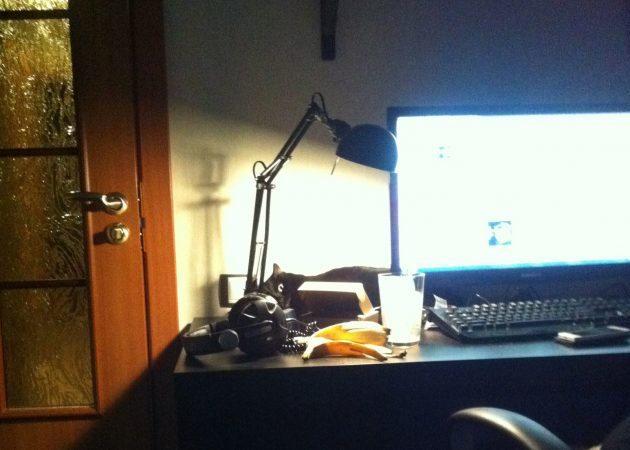
I made lighting of the LED strip. At some point, tired of turning on the light for printing control. In the future we plan to mount the camera and connect to the printer Raspberry Pi for remote monitoring and sending models to print without juggling the stick.


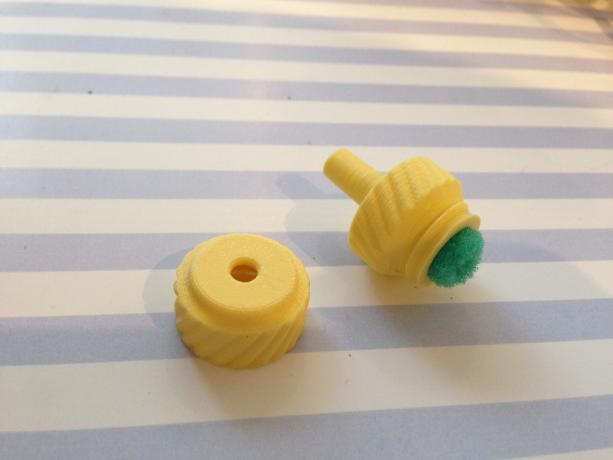
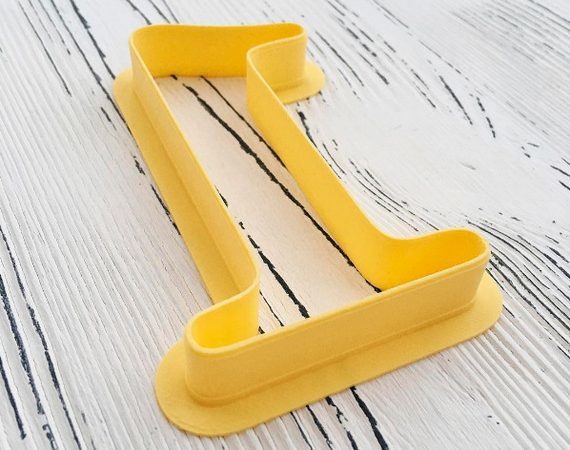
To reduce the noise from the printer, you must enclose it under the rubber spacers. You can print them as well until I has managed here such silicone stoppers, once bought a washing machine.


If you have kids, this designer will be very useful and interesting. Introduce children to this area will be easy, and they themselves will be in a rush to print a variety of toys, construction sets and intelligent robots.
By the way, the country is now actively open children's parks, where children are taught to new technologies, including modeling and three-dimensional printing. Have a printer at home will be very useful for the enthusiastic child.
If I had such a thing as a child, my happiness would not be the limit, and if we add to this a variety of motors, The Arduino, sensors and modules, at least me, probably, and all swam roof of opportunities that would be me opened. We instead melted plastic from old toys and lead from batteries found in the garbage.
Everyone who decides to repeat, I wish you a successful assembly and fast arrival of goods ordered. :)
Thank you for your attention, if you have questions, ask.
Very useful Russian-speaking resource, where you can find any information in this area: 3dtoday.com.
Thousands upon thousands of ready-made models for printing anything: thingiverse.com.