How to use a caliper correctly
Miscellaneous / / September 10, 2023
Let's figure out what it is, what they are and how to take measurements correctly.
What is a caliper and how does it work?
This is a high-precision measuring device with which you can determine linear external and internal dimensions, as well as the depth of holes. It is not as familiar to us as a ruler or tape measure, and at first glance it may seem incomprehensible. In fact, the instrument is little more complicated than the devices mentioned.
The caliper is based on a rod with a scale in millimeters, which is why it got its name. On opposite sides of the rod there are protrusions-sponges for external and internal measurements. The mating parts of the jaws are located on a movable frame with an auxiliary vernier scale, which moves along the main one. In addition, the caliper has a depth gauge ruler and a lock in the form of a screw or button.
When measuring, the part is inserted between the outer jaws, or the internal jaws (or depth gauge) are inserted into the part itself, after which the resulting size is read: integer values
millimeters from the main scale, fractional - from the vernier. The measurement accuracy depends on the graduation of the additional scale and can be from 0.1 to 0.02 mm. Usually the division price is indicated on the case.What other types of calipers are there?
In addition to the classic mechanical caliper described above, there are also varieties with a dial and a digital screen. The only difference between them is in the way they read readings - they are much simpler and do not cause any difficulties.
What can you measure with a caliper?
As already mentioned, this device can easily determine any linear dimension. The outer jaws can be used to measure the thickness of the sheet metal, drill diameter, bolt thread. Internal - the diameter of the pipe from the inside, the thread of the nut, the size of the inner race of the bearing. A depth gauge will help determine the depth of holes or grooves in parts, as well as the size of the ledges.
How to use a caliper
Reading dimensions does not depend on which jaws or depth gauge are used, but for clarity and better understanding we will analyze each specific case of measurements: external, internal and depth.
How to determine the outer size
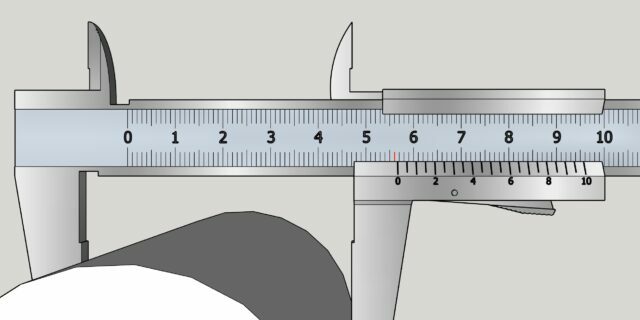
Holding the caliper perpendicular to the part being measured, place it between the lower jaws and bring them together until they stop, but without excessive force, then fix the frame.
1 / 0
Illustration: Artyom Kozoriz / Lifehacker
2 / 0
Illustration: Artyom Kozoriz / Lifehacker
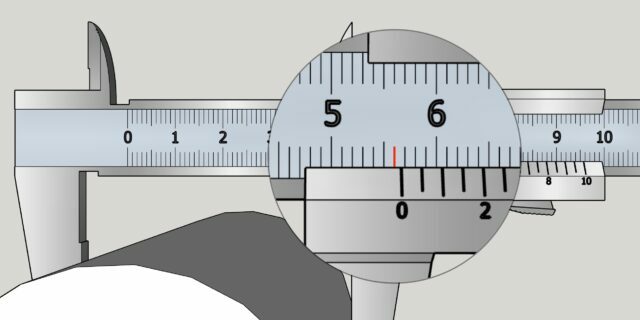
Carefully remove the part and count the number of marks on the main scale to the left of the zero mark on the vernier. This will be an integer value in millimeters. In our example - 56 mm.
1 / 0
Illustration: Artyom Kozoriz / Lifehacker
2 / 0
Illustration: Artyom Kozoriz / Lifehacker
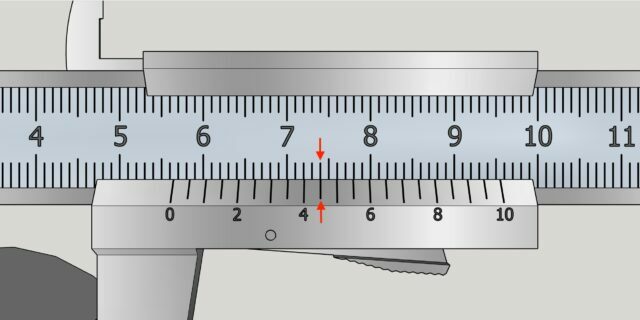
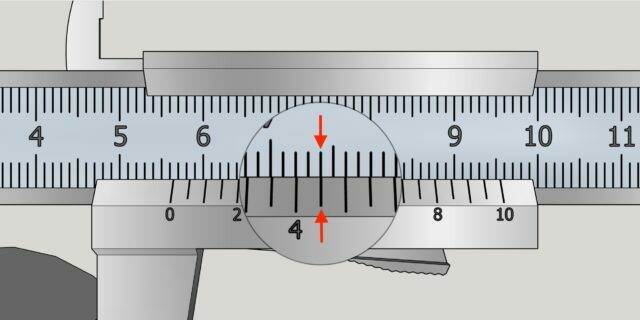
Look carefully at the vernier scale and find the division that most clearly coincides with any mark on the main scale. This will be a fractional size in fractions of a millimeter. In the example - 0.45 mm. If the coincident division turns out to be a zero mark, then the part being measured has a size in whole millimeters without a fractional part.
Finally, fold both obtained values to find out the exact size. In the described version, you get 56 + 0.45 = 56.45 mm.
How to determine the internal size
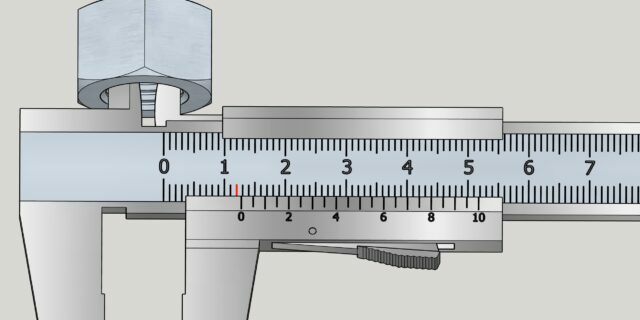
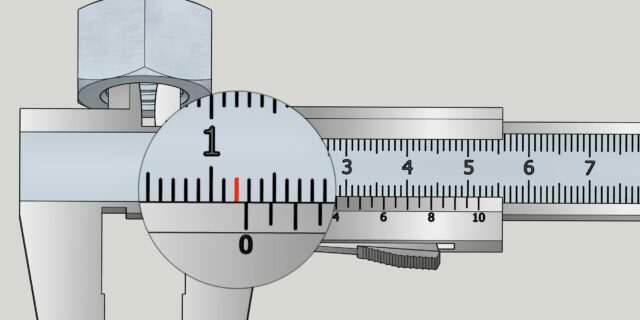
Insert the upper, sharp jaws of the caliper into the part being measured and spread them all the way, trying to maintain a position perpendicular to the surface. Secure the frame.
1 / 0
Illustration: Artyom Kozoriz / Lifehacker
2 / 0
Illustration: Artyom Kozoriz / Lifehacker
Remove the part carefully so as not to move the moving part of the device. Look how many divisions of the main scale reach the zero mark on the vernier. This will be a whole number of millimeters. Ours is 12 mm.
1 / 0
Illustration: Artyom Kozoriz / Lifehacker
2 / 0
Illustration: Artyom Kozoriz / Lifehacker
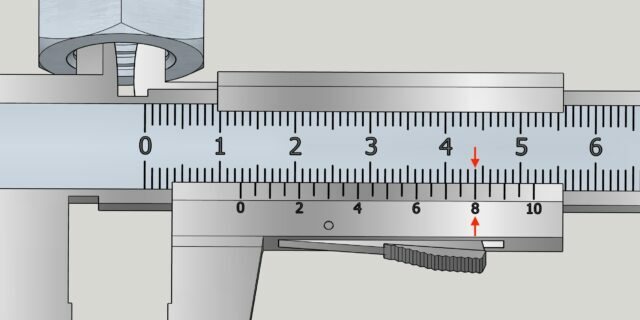
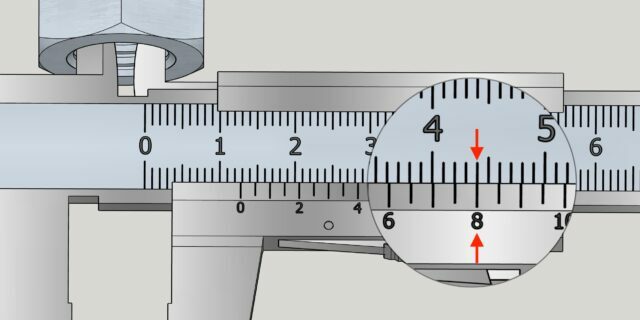
Now look at the auxiliary scale and determine which of its divisions most clearly corresponds to the markings of the main scale. This will be the size in fractions of a millimeter. In the example - 0.8 mm.
Next, add the whole ones and fractional measurements to get the exact size. For us it will be 12 + 0.8 = 12.8 mm.
How to Determine Depth
Open the caliper to free up the depth gauge ruler. Place it over the hole or ledge of the part and lower the main scale until its end rests on the surface. After this, fix the frame.
1 / 0
Illustration: Artyom Kozoriz / Lifehacker
2 / 0
Illustration: Artyom Kozoriz / Lifehacker
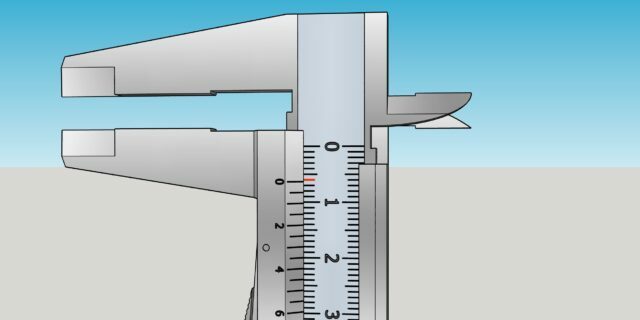
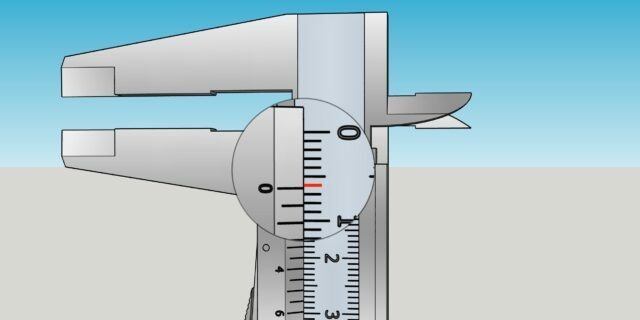
Carefully pull out the instrument and see how many divisions of the main scale reach the zero mark of the vernier. This is a whole number of millimeters. In the example above it is 6 mm.
1 / 0
Illustration: Artyom Kozoriz / Lifehacker
2 / 0
Illustration: Artyom Kozoriz / Lifehacker
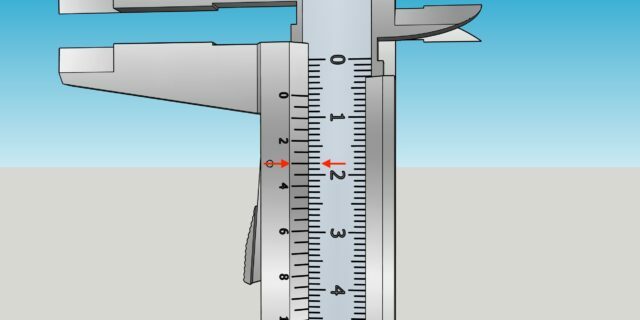
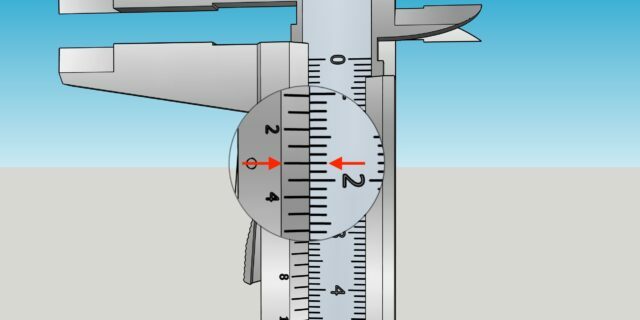
Next, look at the vernier and determine which of its divisions exactly matches any mark on the main scale. This will be a fractional number of millimeters. Ours is 0.3 mm.
Finally, add the measurements from both scales to get your exact size. In our example, it comes out to 6 + 0.3 mm = 6.3 mm.
Articles for those who like to work with their hands🪜⚙️🔨
- How to install a sink: step-by-step instructions
- How to use a laser level
- How to use a multimeter correctly
- How to illuminate the work area in the kitchen
- How to install a socket


