0
Views

With Lifehacker's detailed instructions, even a beginner will succeed.
This can be done twice during the season. Around the end of May - beginning of June, the hydrangea releases young shoots that are suitable for cuttings.
Another optimal time for the procedure is in July. At this time, cuttings are cut from shoots that are already lignified from below, and remain green on top. Try to get there before the start flowering. As a rule, cuttings from twigs with buds that have not yet opened are best rooted.
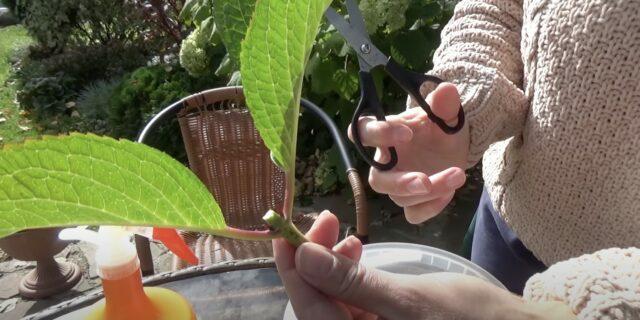
If you are doing this spring, look for fragile shoots on the hydrangea bush that have not yet become covered with wood. If the branch is small, you can cut it entirely. At the shoot lignified from below, only the green top is removed. For summer cuttings, choose specimens with buds. If there are none, use young green shoots. There should be at least 2-3 pairs of leaves on a branch. Cut off a suitable shoot with secateurs or scissors.
From the bottom pair of leaves on the branch, step back about 1 cm up and make an even cut.

1 / 0
Frame: SUPER - VACATION at the COTTAGE / YouTube
2 / 0
Frame: SUPER - VACATION at the COTTAGE / YouTube
Cut the bottom of the cutting at an acute angle.
Shorten the sheet plates with scissors, leaving literally 1 cm. So the stalk will not waste energy on food and take root faster.
Thus, several cuttings can be made from one shoot. It will be possible to root even the top of the branch. She needs to leave a couple of leaves, and cut off the apical ones. If there is a bud on the branch, remove it too.
For rooting hydrangeas suitable pots or cups with a volume of about 0.5 liters with several holes to drain excess liquid. At the bottom of the tank, put drainage, such as expanded clay or pieces of foam, with a layer of 1.5 cm. Pour 1.5–2 cm of sand on top. Then prepare a mixture of 60% garden soil or peat and 40% sand. Fill the containers about ⅔ full with this substrate and tamp it down thoroughly.
Dip the sharp tip of the cutting into water, and then into a rooting stimulator - for example, Kornevin powder. Insert the stick into the ground and deepen to the leaves.
Pour the hydrangea stem generously with water under the root. Keep adding liquid until it starts to overflow from the pot's drainage holes.
Pour sand around the handle with a layer of 2 cm and carefully compact it.
Cut off the bottom of a plastic bottle to make a cap. Cover the cutting with it, firmly inserting it into the ground.
Put mini greenhouse in a warm place with a temperature of about 20-22 degrees. It is important that the pot is in the shade and not exposed to direct sunlight during the day.
On average, the rooting process takes 3-4 weeks. The fact that everything went well will be indicated by the appearance of young leaves on the handle. After that, remove the cover from the pot, put it in the shade at a temperature of 20-22 degrees and water regularly, preventing the soil from drying out.
In the autumn, before the first frosts, send containers with hydrangeas to a cool room with a temperature of 3-5 degrees - for example, in the basement or on a glazed balcony. Leave the plants there until about March. During the winter, periodically check the flower and water as the earthen coma dries up.
In March, take out the pots and put them on a bright windowsill. Keep watering the plants, and by the summer they will be ready for transplant to a permanent place.
Read also🧐