
0
Views

This seemingly banal process has its own nuances.
There are three types of valves on bicycle tubes through which the wheels are inflated: Schrader, Presta and Dunlop.
In fact, a suitable pump is the only thing you need. It is also desirable to have a separate or built-in pressure gauge for accurate pressure control, but you can do without it.
The pump must be suitable for your type of nipple or be universal with support for both types of valves. Alternatively, you can use an adapter that will turn a type of presta (or Dunlop) into a shredder and allow you to inflate the wheel with a regular car pump. These adapters can be found at bike shops by asking for "FV/DV → AV adapter" or "Presta → Schrader adapter".
No matter how trite it may sound, but first you need to deal with the pump. It is important to understand which valves it allows you to pump, especially if you have never done it. All pumps can be divided into three categories.
Regardless of the type, the pumps can be equipped with a built-in pressure gauge to monitor the pressure. It is often inferior in accuracy to individual devices, but it's better than nothing.
If the nipple type is on wheel and the pump match, then everything is simple. Universal pumps with two holes or tips are also quite easy to deal with: use the larger ones for the shredder, the smaller ones for the presta. They are easy to distinguish visually, and usually the outlets are indicated by one of the markings mentioned at the beginning of the article, or by a schematic representation of the valve.
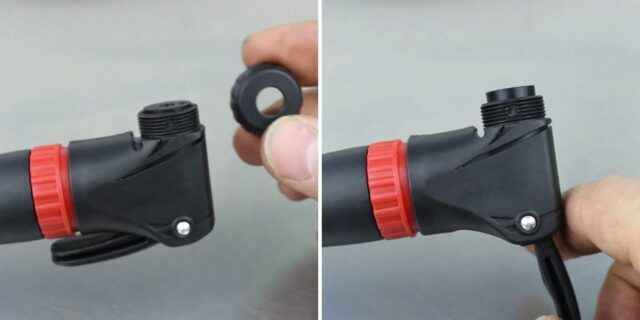
Many do not know, but all modern single port compact pumps support both types of nipples. By default, they are set to a shredder, but for use from a preset, it is enough to rearrange the valve core.
1 / 0
Frame: Cycle Maintenance Academy / YouTube
2 / 0
Frame: Cycle Maintenance Academy / YouTube
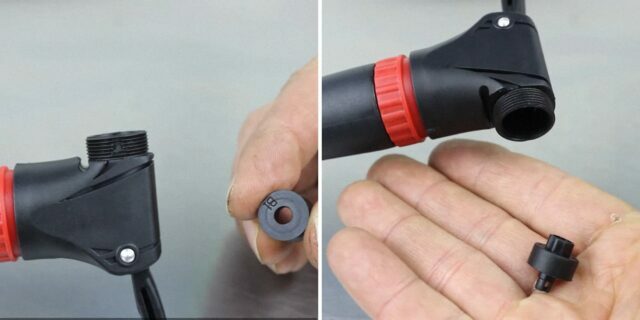
To do this, unscrew the nut from the pump tip and move the valve lever to the operating position - usually from horizontal to vertical. Remove the rubber barrel bushing and the plastic insert underneath.
1 / 0
Frame: Cycle Maintenance Academy / YouTube
2 / 0
Frame: Cycle Maintenance Academy / YouTube
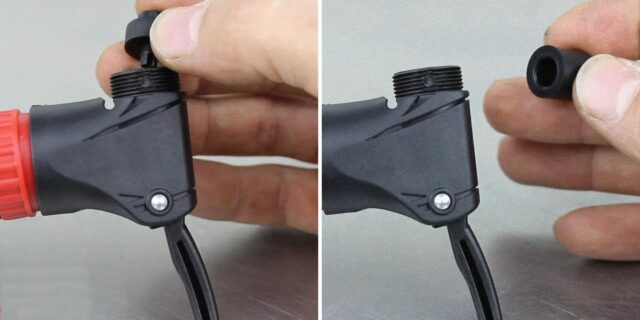
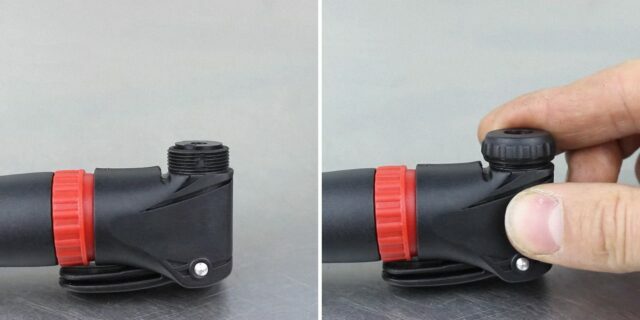
Turn the plastic part over with the thin end inward and then insert the elastic band, also turning it over so that there is a hole of a larger diameter inside and a smaller one on the outside. Fold the lever and screw the nut into place.
Roll the bike or spin the wheel so that the chamber valve is at the bottom. Secure the bike in a stable position by standing it on the footrest or leaning it against a wall, tree, pillar.
Unscrew the protective cap to gain access to the valve. Put the item in your pocket or in a conspicuous place so as not to lose it.
On the presta nipples, additionally unscrew the valve stem nut. Don't worry, it won't fall off. Give a couple of quick pushes on the stem to check that the valve is opening and to blow out any debris.
Make sure the vent is perpendicular to the rim and not tilted to either side. With a significant displacement, it will have to be corrected, otherwise there is a risk of separation, for example during hard braking.
To do this, completely release the air from the chamber by pressing the spool. On the valves, the shredder is recessed, so you need to press with the back of the cap or with something thin like a key. If the rim has a locking ring on the nipple, unscrew it to release the tip.
Next, grab the spokes with one hand, and the tire with the camera with the other. Slide it to the opposite side of the inclination of the nipple until it is vertical.
If the pump is compatible with the wheel nipple, skip this step.
If you want to inflate the presta chamber with a car pump with a shredder tip, simply screw the adapter on top.
In the absence of an adapter, you can get out of the situation as follows. Take the protective cap from the nipple and completely cut off the top of it to make a kind of tube. Screw it in place to add the missing thickness for the shredder pump head.
Simply put the compact hoseless pump on the nipple until it stops, trying to keep it perpendicular without distortion so as not to bend the valve. Then lock the valve by lifting the lever.
If the pump is equipped with a hose and nozzle, put it on the nipple and raise or lower the locking lever (depending on the design). If the end of the hose has a nut instead of a tip, screw it by hand onto the valve or adapter.
While holding the pump and gently moving its piston, inflate the wheel until the tire takes shape. On hoseless models, be careful not to bend the valve: to do this, grab the device with your hand along with adjacent knitting needles and use them as an additional support.
In order for the tire to stand up straight, it must be straightened. Squeeze tire with your hands and, slightly shaking across the rim, make sure that it sits without distortions and is recessed into the rim evenly around the entire circumference.
Fully inflate the wheel to the tire manufacturer's recommended pressure. Usually this is the average value between the minimum and maximum, which is always indicated on the tire in bars (bar).
For example, on the wheels of city bikes something like min 2.7 bar - max 4.4 bar will be written. For everyday driving, you can safely bring up to 3.5 bar. Although this is a matter of personal preference, which depends on many factors.
If you don't want to bother, use calculator, which will give the optimal pressure after entering information about the bike, tires and rider.
It is important to understand that under-inflated wheels dampen worse, which is why there is a risk of damage to the rim during bumps and bumps. Also, lowered tires are more likely to break through, it is harder to ride on them because of the worst rolling. At the same time, the minimum pressure provides better grip and cross-country performance.
High pressure is harmful in that it accelerates the wear of the central part of the tread, and also adds the risk of tearing on a bump and makes ride uncomfortable - vibration from the slightest unevenness is transmitted to the hands and body. However, well-inflated wheels improve rolling, allowing you to spend less effort.
For driving on sand and loose ground, snow, you can reduce the pressure to a minimum or slightly higher. For smooth asphalt and good quality pavements, go a little under the maximum.
The optimum pressure also depends on weight rider and load: light riders need a lower value, heavier riders a higher value. Here are approximate numbers for regular city and mountain bikes. For more accurate calculations, use the calculator, the link to which is indicated above.
| Weight, kg | Pressure, bar |
| 50 | 2,38–2,59 |
| 63 | 2,52–2,72 |
| 77 | 2,72–2,93 |
| 91 | 2,86–3,06 |
| 105 | 3,06–3,27 |
| 118 | 3,2–3,4 |
Another point to consider is the air temperature. In summer, you can not pump the wheels to the maximum, so that when the air heats up and expands, the pressure does not exceed the allowable one and the wheel does not burst. In winter, on the contrary, it is necessary to maintain a value not lower than the average so that it does not fall on the street and the tread works properly.
The easiest way to determine the pressure is on the built-in or separate pressure gauge. To do this, turn it on, put it on the nipple and look at the scale or screen. If you didn’t pump it up, add air, if you overdid it, lower it a little, pressing the spool, and check again.
Without a pressure gauge, there is no way to measure the exact pressure, but you can still understand that the wheel is sufficiently inflated. All you need is get on a bike and see how the tire behaves: if it doesn’t bend at all, then the wheel is overinflated, if it is pressed in too hard (about half the thickness), then vice versa. If the deflection is small, but there is, the pressure is just right.
When squeezed by hand, the inflated wheel of a city or mountain bike should sag with little effort. On road bikes and sport bikes, the tire should only be compressed with a lot of force and very little.
When the wheel is inflated, move the pump valve lever to the off position or unscrew the hose from the nipple and disconnect the device. On presta valves, be careful not to rock the pump from side to side when removing it, so as not to accidentally bend the rather delicate spool stem.
If you used an inflation adapter, remove it by working counterclockwise. Then replace the protective cap and screw it on. On presta valves, before doing this, do not forget to tighten the stem locking nut.
Do not linger on the shredder valves when disconnecting the pump, otherwise you will release a lot air from the camera. The faster you remove it, the less pressure will drop.
Unfortunately, pumping up a flat tire without a pump will not work. Life hacks from the Internet like pouring water, inflating with your mouth, and the like do not work. All really valid recommendations one way or another come down to somehow getting a pump or gaining access to a compressor.
Therefore, if you are in a relatively crowded area, try to ask other cyclists or drivers passing by for a pump. You can also take the bike to the nearest tire shop or gas station and use their compressor to inflate the tires.
If your bike uses presta nipples, it's important to have a shredder adapter with you. After all, it is precisely such nozzles that in 100% of cases will be on pumps that motorists will lend you, and in compressors at gas stations or tire fitting.
Read also🚴♀️🚴♂️🚵♀️

