
29
Views

11 iOS offers a new built-in scanner, which not only saves time, but also will be another convenient way to store information. It will not replace full-fledged program for scanning, but will be a good alternative if you need to quickly make a copy of the document for further work.
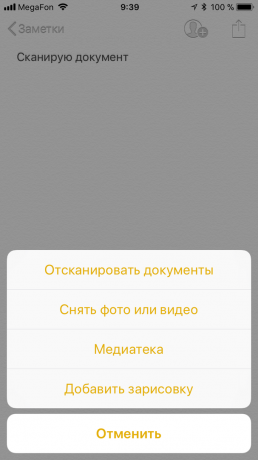
To scan a document, open the "Notes" on the phone, and then open any account or create a new one. Click on the + in the center of the screen and select "Scan Documents". Point the camera at a document and wait for it to take over the whole region (it will turn on the yellow screen). After this scan is done automatically. If not, then just do it manually by pressing the button at the bottom of the screen.

After scanning, the document can be edited. You can rotate the image, crop, apply filters (color - for photos and black and white - for texts). The resulting file can be saved in PDF format for further editing, storage in iCloud, on your iOS devices or third-party services such as Google Drive. Print the document and transmit devices can use the "Share" button.
In the "Notes" also have the option to add a comment or your signature, select a part of the document by selecting the desired option. If you work on the iPad Pro, you can use Apple Pencil: with it the quality of the signatures in the "field" conditions, would be more acceptable.


Despite the fact that the "Notes" are now given the technical possibility to scan documents, OCR text function here. As a result of scanning business cards, for example, you get a well-formatted photo. Of course, it is possible to drive the data of contact with her hand, but it would be much more convenient if iOS 11 automatically recognize the text and made it possible to copy it to a new or existing contact.