35
Views

Whether you are changing the old socket during repair or mount a new one after introduction into the apartment. You can not do without the following things:


If you do not change the socket, and install a new one - go to the next section.
A screwdriver with insulated handle unscrew the fastening screw, which is located at the center, and remove the cover.
YouTube-channel "Electricians in the house"
Do not forget that the socket contacts are live! Do not touch them with a screwdriver and proceed with extreme caution.
Inspect the inside of the socket to see two or three wires connected to it. In the old houses they often two - phase and neutral. IN modern apartments the latest grounding added.
YouTube-channel "Electricians in the house"
By color or by a indicator screwdriver determine which of the wires - phase, and what - zero. To do this, take a screwdriver by the handle so that the thumb lay on the metal circle in its upper part. Then, one by one, touch the tip of a screwdriver to the socket contacts. One in which the indicator will light, it will phase two - zero.

When three wires, connect them should be strictly in accordance with the marking. Appointment easily identified by color:
Disconnect the room with the help of circuit breaker in the electrical panel on the landing or in the apartment. To handle this machine needs to be translated down - lights on them will be changed from red to green, or from one to zero. Circuit breakers are not always marked, so be sure to make sure that the food is really energized.

If the apartment is installed a switchboard with multiple guns, disable only those which protect the outlet. So you can work with the light and observe the safety precautions.
If you do not change the socket, and install a new one - go to the next step.
Again, make sure absence of voltage. Alternately touch the socket contacts of the indicator with a screwdriver by touching the metal part of the thumb on the handle - a control lamp does not light up.
YouTube-channel "Electricians in the house"
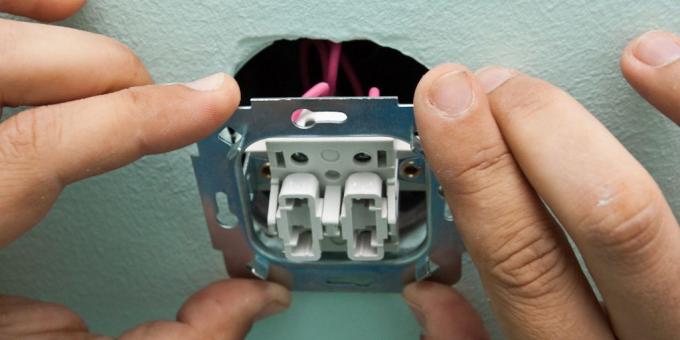
A screwdriver, loosen the clamps and remove the contact wires. Remove the screws fixing the spacers and remove the socket from the mounting box.

Mount a new outlet in the old podrozetnik not work. Soviet mounting boxes have a larger diameter, and modern sockets will simply fall out of them, pulling out of the wall, together with a fork.
Remove the old box or immediately clean the seat in the wall of plaster and dust. Then try on podrozetnik and make sure that it is placed freely, without projecting beyond the level of the wall. If necessary widen the hole.
YouTube-channel "Electricians in the house"
If the wall is made of plasterboard, simply thread the wire through the Escutcheon. Secure the box by tightening locking screw.
YouTube-channel "Electricians in the house"
For solid walls, use plaster or gypsum, mixed with water to a thick slurry. Moisten and apply wall water mixture in the hole. Then thread the wire through the Escutcheon and insert the box, aligning it to the wall. Seal the gap around. Wait a few minutes until the plaster or gypsum zastynut.

If the cable is too long, cut it clippers so that it protrudes from the wall by about 5-7 cm. Carefully remove the outer shell and remove the 5-10 mm of insulation from each wire.
YouTube-channel Remont5.ru
If the socket without grounding wires can be connected in any order. Most likely, her notations will not, but by the rules of phase must be right, and zero - to the left.
The outlet with earthing wire is also allowed to change places, but it is desirable to phase terminal L, a neutral conductor - to terminal N.
Grounding is required to be connected to the terminal with the designation ⏚ or PE! If marking is not present, the central contact, leading to a characteristic mustache within the socket.
Borisov-Pro YouTube-Channel
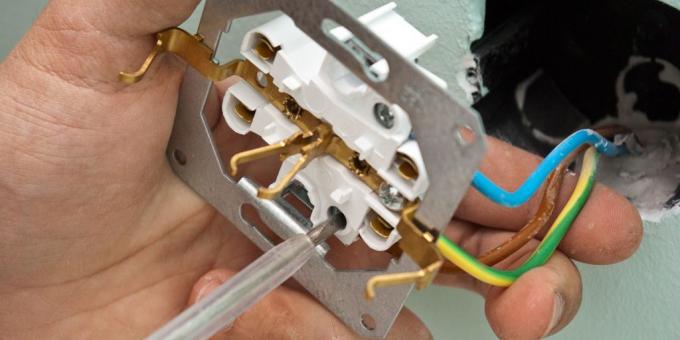
Take a new socket and remove it cover. Loosen the clamping screws of contacts, and then alternately insert the wires in accordance with the marking and carefully tighten. Make sure that it is in the clip got scraped wires, not the insulation.

Recheck the connection is correct and tighten contacts with a screwdriver. Gently bend the wires of conductors, so that they formed an accordion, and insert the mechanism into a wiring box.
Align it horizontally, so that the plug is not skewed. Tighten the side screws that unclench spacers and lock mechanism. If the housing Escutcheon have extra screws for a more reliable fixation, tighten them too.
Borisov-Pro YouTube-Channel

Put the upper socket cover and secure it with a screw. If the design provides for decorative panel, pre-install it.
YouTube-channel "Electricians in the house"

Apply power by turning the switch in the control panel on the court or in an apartment. Be careful not to confuse breakers.

If the electricity supply light is extinguished and the machines are not knocked out, it means you did everything correctly. But before turning to the outlet some devices, it is better to check it again.
To do this, take a screwdriver and the indicator alternately touch all contacts. The light should be just right. On the left contact and ground antennae flame indicator light does not.