How to make an aviary for a dog with your own hands
Miscellaneous / / August 20, 2023
Detailed instructions on how to choose a place, dimensions and materials, and five examples of designs for a country house and apartment.
What is important to know
If you keep a dog in a country house, it is difficult to do without an aviary. Depending on its size, the pet can stay in it both permanently and temporarily, for example, when your guests, workers or other strangers are in the yard. Subject to the rules for arranging the enclosure, the dog will feel comfortable inside, and the territory will still be under reliable protection.
About choosing a place
It is advisable to place the dog enclosure away from sources of strong odors and noise, which can interfere with the "guard" to monitor the situation.
Open walls are best oriented to the south, southeast, or southwest, while closed walls are best oriented to the north. At the same time, the location should be such that the dog must see the front door and the gate, as well as most of the yard.
Ideally, for an aviary, you should choose a place slightly on a hill, and not in a lowland. This will provide maximum visibility and avoid
flooding. It is good if there is a tree or bush nearby for protection from the sun and wind.About materials and construction
The classic dog kennel is a fairly simple building where a pet can hide from the weather. The design should be with a lattice so that the dog can observe the territory entrusted to him.
The booth is installed inside or outside, but with a hole from the cage. If there is space on the site, the aviary can be supplemented with a warm-up paddock - a fenced paddock that is adjacent to the building and is connected to it by a lockable door.
At least two walls of the enclosure are made closed to protect against drafts, and the rest are open so that the dog can visually control the area adjacent to the enclosure.
Floor
The base of the dog enclosure should be dry, durable and relatively warm. Concrete and asphalt are cold materials and will harm your pet's joints and claws, so it's best to use wood. For example, a wooden deck made of well-planed and sanded boards 35-45 mm thick (ideally tongue-and-groove), raised 15-20 cm above the ground. It should be painted only from below to protect it from decay, it is not worth it from the inside.
frame
For him, it is best to use metal: profile pipes, corners. This will give the structure not only strength, but also reliability - the dog will not be tempted to gnaw on the frame. However, wooden elements are also allowed, but then they should be mounted without gaps so that the pet cannot pry them off and start to gnaw.
Walls
The rear and at least one of the side walls of the dog enclosure must be deaf to protect against drafts. For them, you can use wooden shields, OSB boards, plywood, lining - in a word, everything that will allow you to sew up the surface without cracks.
Open walls should be in the form of a lattice, and it is best to make it complete - with rods from reinforcement or a 10 × 10 mm or 12 × 12 mm profile pipe. You can take a thick strong mesh. Chain-link and other thin nets for fences are not suitable: sooner or later the dog will bite them and at the same time may get hurt or get stuck.
Gate
It is optimally made from the same material as walls. For safety reasons, it should open inward and have a reliable constipation that the dog cannot open. Also, the gate must cover the opening completely, without cracks and “windows” under the ceiling, otherwise the pet will strive there and may be injured or stuck.
Roof
The only requirement is to serve as a protection against precipitation, including side rain. Therefore, in front of the roof overhang, it is worth making a protruding one in order to create a visor of 30–50 cm. It is undesirable and even harmful to leave a space between the wall and the roof so that the dog does not try to climb through and get stuck.
Slate, corrugated board, metal tile, ondulin, bituminous tiles are suitable as a material. It is preferable to use a soft roof so that when it rains, the pet is not disturbed by the sound of rain on metal.
About sizes
If the aviary is intended for a short stay, it can be relatively small (within reasonable limits), as long as the dog is placed in it. If the pet will be kept in the aviary permanently, he must have at his disposal a “living space” corresponding to his dimensions. Focus on the height of the dog at the withers and the recommendations of dog breeders:
- up to 50 cm (small) - from 6 m²;
- from 50 to 65 cm (shepherds, huskies) - from 8 m²;
- over 65 cm (Alabay, Caucasian Shepherd Dog) - from 10 m².
In addition, the height of the enclosure should be made convenient for you, 2 m is considered the standard. Depth is usually also 2 m or so, and the width is changed to such that you get the desired area. The most common "layouts" are 2 × 3 m, 1.8 × 2.5 m, 2 × 4 m, 2.3 × 2.8 m.
How to make an aviary with a wooden frame, pitched roof and bars
This is a fairly simple, but reliable enclosure with a wooden deck and a booth inside. The frame is made of boards with lining of two walls with clapboard and gratings from a profile pipe. Of the possible limitations - you will need a welding machine and, accordingly, the ability to use it. You can ask a friend for help and hire specialist - there will be little work, and it is not very difficult.
What you need
- Pipe 20 × 20 mm;
- board 25 × 100 mm;
- board 40 × 100 mm;
- board 50 × 200 mm;
- Door hinges;
- latch;
- lining;
- ondulin;
- bricks or paving slabs;
- nails;
- self-tapping screws;
- antiseptic;
- varnish or oil for wood;
- circular or hand saw;
- screwdriver;
- welding machine;
- hammer;
- roulette;
- pencil;
- level;
- drill.
How to do
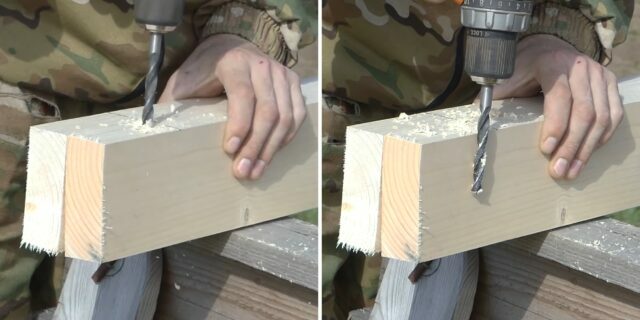
From a 50 × 100 mm board, assemble the lower trim in the form of a frame, focusing on dimensions of 2 × 3 m. Connect the boards to long self-tapping screws, screwing two in each corner. Pre-drill the places for fasteners with a thin drill so as not to split the wood. If you have clamps, use them for easier and more precise assembly.
Set the harness in place by lifting it off the ground with tiles or bricks at the corners. Make sure that the diagonals of the structure are the same and that it is level.
Assemble the floor from 50 × 200 mm boards, fixing each to a pair of self-tapping screws, pre-drilling holes for them. You can leave small gaps between the boards for drainage.
If you did not saw the boards immediately to size, cut off the protruding parts of the flooring. Treat surfaces with an antiseptic to extend the life of the product.
From a board 40 × 100 mm, make and fasten the racks at the corners: in front - 1.9 m high, in the back - 1.8 m to create a slope. Level the posts strictly vertically in both planes and fix them on temporary braces.

1 / 0
Frame: House Master / YouTube

2 / 0
Frame: House Master / YouTube
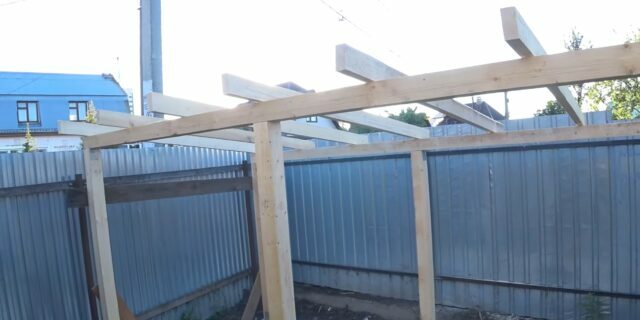
Install top rails with 40 x 100mm boards or a pair of folded 25 x 100mm boards. Drill them halfway to make grooves for the self-tapping screws. It is desirable that the crossbars protrude in front and behind - to create roof overhangs and protect against precipitation.
Mount the front and back of the harness by adding a couple more crossbars in the middle at an equal distance from each other and the edges.
Stuff a crate of 25 × 100 mm board over the strapping, maintaining a distance of 30.5 cm between the centers of the boards. Do not forget about 15–20 cm outlets from the sides for overhangs.
Mount the roof by laying sheets with an overlap of 15-20 cm vertically and 1 wave horizontally. Fix by nailing into each wave along the perimeter and through one in a checkerboard pattern inside. If ondulin needs to be cut, use a hacksaw soaked in water.
Sheathe the back and one of the side walls with clapboard and treat with varnish or other protective coating.
According to the internal dimensions of the frame of the enclosure, make a lattice for the front wall from a profile pipe 20 × 20 mm. For rods, take the same pipe, and use a board 10 cm wide as a template for the distance between them. Add a jumper across the bars for rigidity. Hang the gate on hinges and install the latch.
In the same way, make a side wall-fence, and then cover all metal parts with paint to protect them from corrosion and give the aviary a more aesthetic look.
Install the gratings in the aviary and secure around the perimeter with self-tapping screws, having previously drilled holes in the outer wall of the pipe. To maintain the same gaps, use linings from the scraps of the board.
It remains to put a booth inside and invite the pet to a housewarming party.
How to make an aviary with a wooden frame, pitched roof and mesh
This is a simple wood and mesh enclosure project that eliminates the need for welding. The exception is a gate made of a profile pipe, but it can also be assembled on bolts or pipes can be replaced with a wooden block. An excellent option for medium-sized and non-aggressive dogs.
What you need
- Wooden beam 100 × 100 mm;
- board 100 × 25 mm;
- board 200 × 40 mm;
- board 100 × 40 mm;
- lining;
- wood oil;
- ondulin;
- net;
- paving slabs;
- mounting corners;
- loops;
- latch;
- pipe 20 × 20 mm;
- self-tapping screws;
- mounting tape;
- nails;
- screwdriver;
- hammer;
- roulette;
- level.
How to do
From a 100 × 100 mm timber, assemble the bottom trim in the form of a rectangular frame and add a longitudinal beam in the middle for reinforcement. Treat the structure with an antiseptic. Measure the diagonals of the strapping and make sure they are the same.
For connection, use mounting angles and self-tapping screws. Install the trim on the tiles and lay with pieces of roofing material for waterproofing. To raise the structure above the ground, use concrete blocks or, as the author of the project, filled with crushed stone tires.
From a 200 × 40 mm board, make a flooring using self-tapping screws or nails for fastening. Sand the surface to remove all burrs and irregularities.
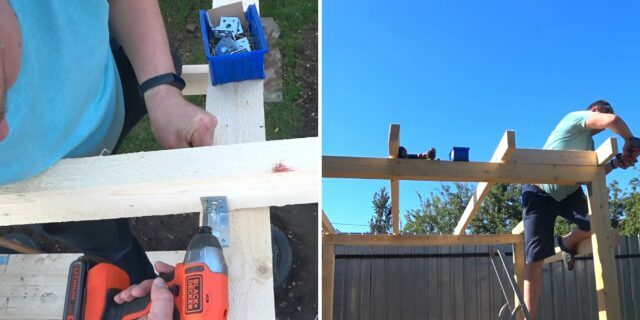
From a bar 100 × 100 mm, make and fix with the help of mounting angles and self-tapping screws the rear racks of the frame 1.7–1.8 m high. Level them and temporarily fix them with jibs. Install and fasten the back of the top harness from above.
Install the rest of the uprights and the front of the top harness in the same way. Add one extra rack in the middle - front and back.

1 / 0
Frame: Visiting the master / YouTube

2 / 0
Frame: Visiting the master / YouTube
Saw rafters from 40 × 100 mm boards and install them in 60–90 cm increments (you can make a template to adjust the distance). Take care of the release for future roofing 30-50 cm in front and 10-15 cm behind. For fixing, use mounting brackets and self-tapping screws on both sides of the rafters.
On top of the rafters, stuff a batten of 25 x 100 mm board in 30.5 cm increments between the centers of the boards, securing with a couple of nails at each point. Do not forget to make releases of 10-15 cm to protect the walls from precipitation.
Cover the roof with ondulin, overlapping one wave in width and 15–20 cm in height. Fasten with roofing nails in each wave around the entire perimeter and then through one board of the crate in a checkerboard pattern.
If the sheets need to be cut lengthwise, use a sharp knife. For a cross cut, a jigsaw or a regular hacksaw is suitable. To prevent the blade from getting stuck, pour water over it.
Sew up the back and side walls with clapboard. Treat all surfaces except the floor with oil or other wood preservative.
Install the net on the front of the aviary. For fixing, use the supplied brackets or mounting tape.
Weld a gate from a 20 × 20 mm pipe in the form of a frame according to the size of the opening with a cross member in the middle, hang it on hinges and put a bolt.
How to make an aviary with a metal frame, pitched roof and paddock
This is a variant of a 2 × 3 m aviary with a metal frame, two walls made of clapboard and a lattice made of reinforcement. The highlight of the project is in the paddock, which is adjacent to the side wall and has the same area as the enclosure itself. The pet will definitely be grateful to you for the opportunity to warm up.
What you need
- Pipe 40 × 40 mm;
- pipe 25 × 25 mm;
- pipe 20 × 20 mm;
- net;
- fittings ⌀10 mm;
- bricks or concrete blocks;
- ruberoid;
- board 100 × 40 mm;
- lining;
- ondulin;
- self-tapping screws with a press washer;
- roofing screws;
- wood oil;
- welding;
- angle grinder;
- roulette;
- pencil;
- level.
How to do
From a 40 × 40 mm pipe, weld the bottom trim in the form of a 2 × 3 m frame and add one pipe in the middle along and across. Weld pieces of pipe 25 × 25 mm 5 cm high around the perimeter, which will act as bushings for mounting racks.
Place the trim on bricks, paving slabs or concrete blocks with pieces of roofing material on top and level the structure.
From a 20 × 20 mm pipe, make frame elements: two parts in the form of a turned letter “E” along the edges and two in the form of a “P” in the middle. Insert the ends of the pipes into the bushings on the piping. To create a roof slope, the height of the front must be 2 m, and the back - 1.8 m.
Fasten the structure by welding three longitudinal elements on top and one in the middle of the back wall.
Make a floor from a 100 × 40 mm board, fixing the flooring with roofing screws.
Mount the batten and counter batten from a 100 × 25 mm board with 40–50 cm outlets in front and 15 cm each on the sides and back. Cover the roof with ondulin.
From a 20 × 20 mm pipe, make two sections for a 3 × 2 m (W × H) range fence and one for 2 × 2 m. For structural rigidity, add one longitudinal and two vertical crossbars to each. As rods, weld reinforcement every 10 cm.
By the same principle, make and hang a gate from the same pipe. Then install the fence sections on the bricks, connect them and weld them to the main structure.
Sheathe the back and side walls with clapboard, fastening the boards with self-tapping screws with a press washer. Treat the wood with oil or other weatherproofing compound.
Install a deadbolt on the gate and paint all metal parts to protect against rust.
If desired, supplement the aviary with an opening feeder. To do this, make an outer and inner frame with hinges (on one side) and a holder for bowls from a metal strip. Then weld this whole structure to the grate from the inside and saw the rods so that the door opens.
Put a booth in the aviary and invite your pet - everything is ready.
How to make an indoor cage cage for an apartment
This cute temporary kennel is suitable for small and non-aggressive dogs. Due to the flat countertops it can be used as a bench in the hallway or put something on top of it. The design is made entirely of wood and does not require special tools and skills.
What you need
- Bar 40 × 40 mm;
- plywood 16 mm;
- net;
- self-tapping screws;
- dye;
- wood oil;
- mounting corners;
- loops;
- bolt;
- screwdriver;
- angle grinder or hacksaw;
- drill;
- roulette;
- pencil.
How to do
From a 40 × 40 mm bar, assemble two identical frames of the upper and lower trim measuring 120 × 60 cm and add one cross member in the middle. You can connect the parts through long self-tapping screws, having previously drilled a place under them. If you do not want the fasteners to be visible from the outside, use mounting brackets or a “slanting screw” connection.
Saw off six posts from the bar and assemble the bottom and top straps together, placing vertical elements at the corners and in the middle of the long sides.
Assemble the door frame, measuring in place and leaving a gap of 3-5 mm around the perimeter. Also reinforce the top trim with an additional bar in the middle.
From plywood, cut the ceiling and floor of the enclosure to the size of the frame, and then paint the details on the inside.
Sand well and paint the frame of the structure.
Cut and try on the mesh. Mark and drill holes for the bars.
Install the nets and fasten: from below - by inserting into the holes, along the perimeter - with the help of staples from bent nails with cut off hats.
Cover sharp edges with planks to protect the dog, and fix them with self-tapping screws.
Oil the "top" of the enclosure and attach it from the inside to the mounting brackets.
Hang the door on hinges, install a latch or other bolt - and the aviary is ready.
How to make a collapsible puppy cage
A handy wooden enclosure with a very simple folding structure. It can be quickly decomposed when you need to leave the dog alone, and then just as quickly removed. At the same time, it is quite spacious (dimensions can be arbitrary), but when folded it takes up a minimum of space.
What you need
- Planed timber 25 × 45 mm;
- 4 loops;
- 4 hooks;
- self-tapping screws;
- screwdriver;
- hacksaw.
How to do
For a 1.6 x 1.2 m aviary, collect "fence» from a bar 45 × 25 mm according to the dimensions indicated in the illustration. Measure the gaps with a trimming of a bar and fasten each “picket” with one self-tapping screw on top and one on the bottom. In total, you need to make two identical sections of the fence.
By the same principle, assemble the short side parts of the aviary. They also need two.
Fold the long and short parts together and connect them with loops on the longitudinal bars: one at the top and bottom.
Now fold together the resulting "corners" so that you get a full-fledged fence. In the two corners that were left unconnected, install hook-locks to fix the aviary in the assembled position.
Everything is ready - you can put the dog inside. In order to fold the aviary, you only need to open the hooks.
Read also🧐
- How to make a comfortable and warm booth for a dog
- 7 easy ways to make a DIY cat bed
- Furniture upholstery: how to give a second life to an armchair or sofa and save a lot of money


