How to make a fountain with your own hands
Miscellaneous / / July 31, 2021
From simple flowerpot options to incredible concrete structures.
What you need to know before making a DIY fountain
About the device and principle of operation
In terms of their internal structure, the fountains are quite simple. They consist of a water reservoir with a pump with a filter that pumps the liquid through the supply tube to the spray nozzle. The falling jets of water flow back into the container, and the process is repeated again.
The pump and pipes are usually covered with stones, and the fountain is decorated with various decorations and plants. Optionally add built-in lighting or several lights around.
About the pump
Any device capable of pumping water is suitable for the fountain, from an aquarium pump to a drain pump. However, dedicated fountain pumps are ideal. They can be found in hardware stores for a low price.
The advantages of ready-made solutions are their compactness, tightness and rich configuration. These pumps have flow control, built-in filters, as well as a set of nozzles for the formation of various jets. It is also important that, unlike analogs, they are designed for long-term operation.
For greater safety, the pump must be connected to an earthed socket with an RCD.
About the water tank
As a container for the fountain, you can use any options depending on the size and intended design. Both purchased PVC tanks for ponds and scrap materials such as flowerpots, tires and old bathtubs are used. You can even dig a pit in the ground, sprinkle the bottom with sand, cover it with a strong PVC or butyl rubber film and pave it with stones.
About choosing a place
The garden fountain is best placed on the shady side of the plot so that the water does not bloom in the sun. The place must be chosen so that the structure is visible from the windows of the house, gazebo and other key places.
At the same time, it is undesirable to locate the structure in close proximity to the walls of buildings and garden furniture. There should be trees at a distance from the fountain: from the abundance of moisture, they can overgrow and damage bottom reservoir. In addition, falling leaves will require cleaning the water more often.
About decor and lighting
Unlike figurines, flowers and other commercially available jewelry, stones, shells and any natural materials should be thoroughly cleaned with a brush before immersion in the fountain. Otherwise, the earth will dissolve on them and make the water cloudy.
For the dark time of the day, it would be good to equip the fountain with built-in illumination based on LED strips. Models that smoothly change color are especially beautiful. Keep in mind that even the waterproof versions cannot be completely submerged in water, but rather placed above the surface.
With individual lamps simpler. Especially if you choose self-contained products with a built-in solar battery, which are charged during the day and automatically turn on and illuminate the area at dusk.
In the Telegram channel “Life hacker»Only the best writing about technology, relationships, sports, cinema and more. Subscribe!
In our Pinterest only the best texts about relationships, sports, cinema, health and much more. Subscribe!
How to make a fountain from plastic flowerpots

One of the simplest and at the same time functional designs, which is suitable for both miniature tabletop and full-fledged garden fountains. To collect such, you need a minimum of materials, tools and, most importantly, skills.
What is needed
- Soldering iron or knife;
- marker;
- hot glue gun;
- drill or screwdriver;
- drill;
- large and small plastic flowerpots;
- a tube;
- straws for cocktails;
- scissors;
- pump;
- silicone sealant is optional.
How to do
Place the tube at the bottom of the small flowerpot and trace around with a marker.

Carefully burn through the hole with a heated soldering iron so that it is slightly smaller in diameter than intended. You can use a knife or a suitable drill.
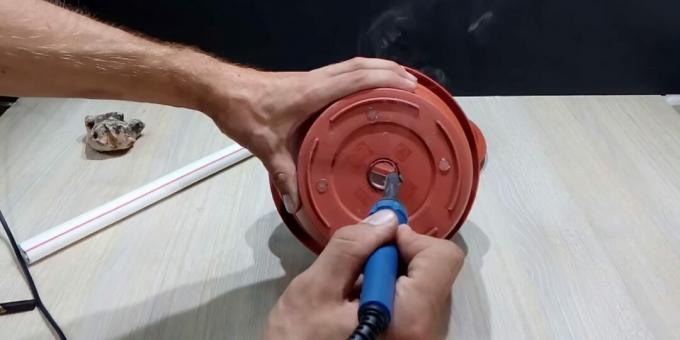
Insert the pipe firmly into the bottom of the pot and fill with hot melt glue to ensure a tight seal.
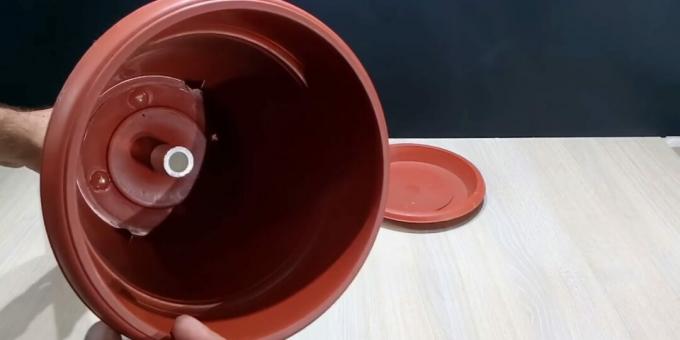
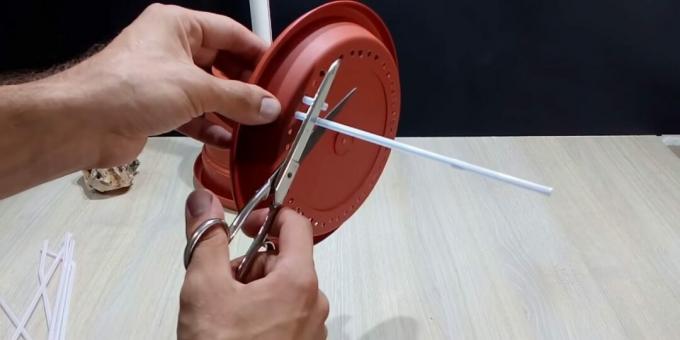
Mark with a marker and drill holes in the plate of the small flowerpot.

Insert straws into the prepared holes so that there are about a centimeter on both sides.
Place the upside-down plate firmly in a small pot and fill the joint well with hot melt glue.
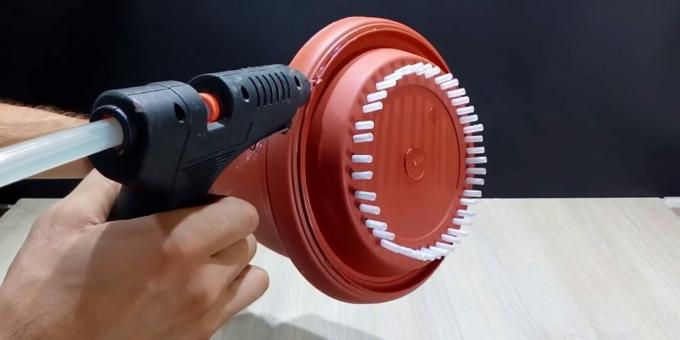
Connect the tubing to the pump and seal the joint with the same hot melt glue or silicone sealant.

Install the resulting structure in a large flowerpot, decorate as you wish and fill with water.

Turn on the pump and start the fountain.
How to make a levitating fountain faucet
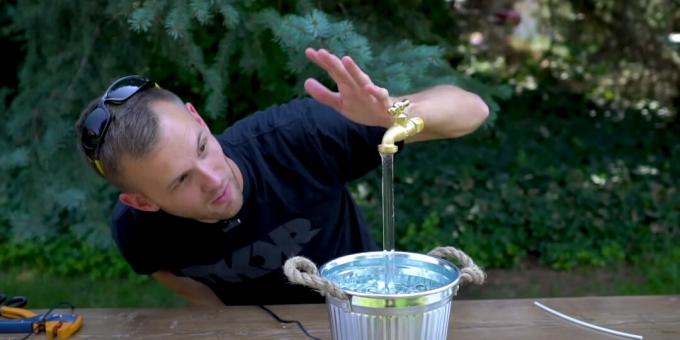
Very unusual fountainthat will definitely delight anyone who sees it. The whole secret is in a transparent tube, through which the water rises up and then flows down, creating the illusion of a working tap. Despite the seeming complexity, it is quite easy to make such a fountain.
What is needed
- Screwdriver or drill with a drill;
- hacksaw for metal;
- marker;
- tap;
- transparent acrylic tube;
- bucket or other container;
- transparent balls or other decor;
- pump;
- sandpaper and optional sander;
- two-component glue;
- sealed battery-powered lamp;
- FUM-tape;
- hot glue gun.
How to do
Drill a hole in the side of the bucket near the very bottom and pass the pump cable through it, placing the device inside. If the plug of the device is not removable, you will have to cut the wire, and then carefully connect it and insulate it. Alternatively, you can simply circle the cable along the wall of the container, and then decorate it.

Place the acrylic tubing on the pump, estimate the approximate position of the faucet and make a note marker.

Use a metal hacksaw to shorten the tube to the desired length.

Trim the sharp edges of the part with a sander or by hand using sandpaper.

Drill several holes in the tube walls at a distance of 2-3 mm from the edge. Remove burrs with a sanding paper.

Apply to outlet fitting crane two-component adhesive, fix the tube inside and press down. Keep parts until cured according to package directions.

Install a tube with a cock on the pump and seal the connection with FUM tape. Place a light under the pump and adjust the cable to the required length.

Use hot glue to seal the hole in the side of the bucket.

Fill the container with decorative material.

Pour water into the bucket and turn on the pump. Yes, and don't forget to turn off the tap! Otherwise, the water will flow from the wrong side.
How to make a cascading fountain from clay vases

An example of a simple but interesting enough fountain. The water in it does not just fall from top to bottom, but flows down in cascades from one level to another. At the same time, such a structure is assembled from ready-made elements in less than an hour.
What is needed
- Drill with drill;
- round file;
- bucket;
- three clay pots of different sizes with plates under them;
- additional large plate;
- silicone sealant;
- pump;
- a tube;
- corner fitting;
- pebbles.
How to do
Soak all pots and plates (except the largest one) in water for 15–20 minutes to make the pottery easier to process.

Use a round file to make two grooves in the side of the large pot plate. Grind off the center piece to create a cutout for the dripping water.

Do the same with medium and small plates.

Turn the large flowerpot upside down and carefully drill a hole in the center just big enough to fit the tube from the pump.

Place the pump with the tubing installed in the additional plate that will serve as the base of the fountain and put on a large pot.

Place a large plate on top and cut the pump tubing so that it reaches the bottom of the part.

Place the base of the fountain in the desired location and start assembling. Pour pebbles and place the pump inside the plate.
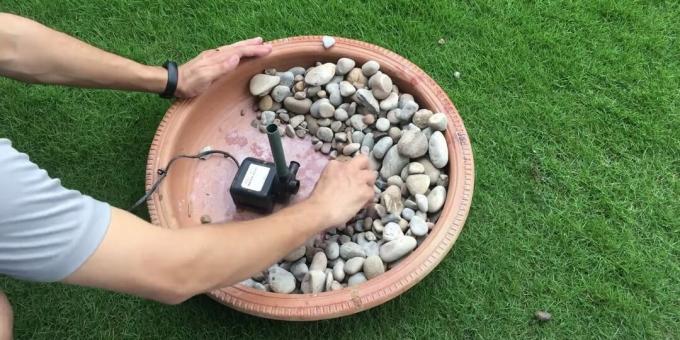
Place the largest flowerpot on top. Lubricate the tubing and large bowl with silicone sealant and join the assembly.

Place the remaining two flowerpots next to each other. Cover them with plates, opening the cutouts from large to medium to small.

Fill the fountain with water and turn on the pump. Place a corner fitting in a large bowl to redirect flow to the middle bowl.
How to make a three-level fountain from ceramic flowerpots

Another fountain made of clay pots and plates, which has a completely different design. It is made just as quickly and easily. Looks good even without additional decor.
What is needed
- Drill or screwdriver with a drill;
- round file;
- knife;
- three ceramic plates of different sizes;
- two ceramic flowerpots of different sizes;
- pump with a watering can;
- hose;
- silicone sealant;
- insulating tape.
How to do
Soak all items except a large plate in water for 15–20 minutes to soak and process better.
Using a drill or screwdriver, drill a hole in the center of the small and medium plates just enough to accommodate the pump tube. If a large enough drill is not at hand, make several holes side by side, and then connect them, expanding to one.

Make the same holes in the pots. The only untouched detail will be the largest dish.

Connect a hose to the pump. If it does not fit snugly, wrap duct tape.

Place the pump in a whole plate and slide an inverted large pot over the hose. File a small cutout on the side of the pot to route the pump cable through.

Slip the middle plate on top, then the second pot, and top the structure with the smallest plate.

Cut off the excess hose and insert it into the watering can. Seal the connection with electrical tape.

Line up the watering can with the bottom of the top plate and carefully coat the hole with silicone sealant. Let it freeze completely, after waiting for a while according to the instructions.
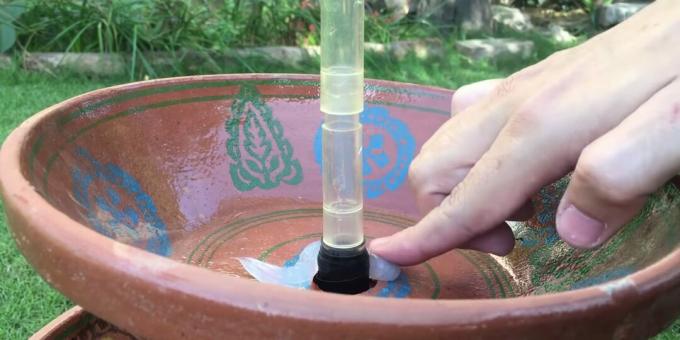
Fill the fountain with water and turn on the pump.
How to make a concrete ball fountain

A compact fountain that fits anywhere in the garden. Such a source is notable for its ideal shape. The water in it does not hit in jets, but flows down the surface of the ball with a soothing murmur. During the manufacture, you will have to get a little dirty, but the process itself should not cause difficulties.
What is needed
- Screwdriver;
- hacksaw;
- a hammer;
- putty knife;
- cement and sand or ready-mixed;
- water;
- glue for concrete;
- repair mortar for concrete;
- wooden block or board;
- thin wooden stick;
- polypropylene pipe;
- cord or strong thread;
- silicone sealant;
- hemisphere shape;
- screws;
- pump with tube;
- plastic bucket;
- metal grid;
- fittings;
- pebbles;
- sponge.
How to do
Assemble the supporting frame for pouring: saw off four bars slightly more than a hemisphere in height and connect them with a frame of four more bars, fastening the entire structure with screws.
Place the hemisphere on the frame. If you do not find a ready-made one on sale, use a globe cut into two parts, a basketball ball or something similar.

Using a crosshair made of stretched threads, find the center and install the tube into it, securing it with silicone sealant.

Prepare a cement-sand mortar from a ready-made mixture or on your own (1 part cement to 3-4 parts sand) by adding water and stirring until mushy. Fill the form and tap it well so that the mass fills all the voids and there are no irregularities on the product.

Wait 2-3 days for the concrete to harden well, and carefully remove the finished hemisphere from the mold. Then make the second half of the ball in the same way.

Trim excess pipes, so that they do not interfere with joining the workpieces.
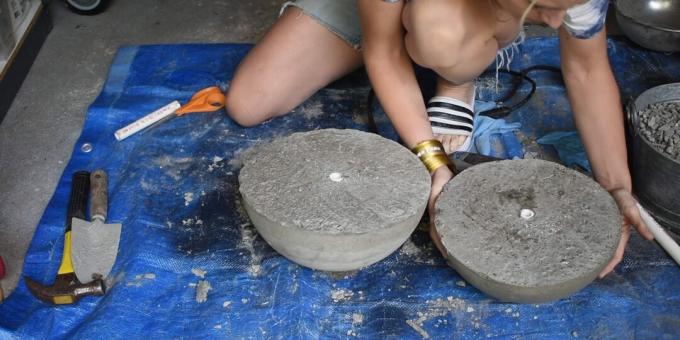
Lubricate the halves with concrete glue or cement-sand mortar. Place them together and secure by inserting a wooden stick into the tubes inside the spheres.

Cover the joint of the resulting ball with a concrete repair mortar or cement-sand mortar. Smooth out with your hands and then with a sponge. Repeat the procedure until you get a flat and smooth surface.

Dig a plastic bucket into the ground at the fountain installation site. Cover it from the outside with earth or sand.

Cover the container with a metal mesh on top. Cut it so that it protrudes 15–20 cm beyond the sides of the bucket.

Cut a hole in the net for the tube and place in the reservoir pump.

Place the ball on the net above the bucket, after placing two pieces of reinforcement so that it does not fall under its own weight. Pass the tube through the sphere and cut off the excess.

Fill the bucket with water and decorate the ball with pebbles, hiding the mesh. Turn on the fountain.
How to make a three-level concrete fountain

This fountain is also made of concrete, but unlike the previous one, it has a more traditional look. Despite the external unpretentiousness of the material, with the proper decor, this design looks very good.
What is needed
- Putty knife;
- hacksaw for metal;
- marker;
- cement;
- sand;
- water;
- pump;
- plumbing pipe with elbow fitting;
- two pieces of sewer pipe of different diameters;
- three shallow pelvis of different sizes;
- bricks;
- film;
- gloves;
- moisture resistant paint;
- brush.
How to do
Prepare the mortar: mix 1 part cement with 3-4 parts sand, gradually adding water. The resulting mixture should resemble sour cream in consistency.
Cover a large basin with plastic wrap and fill it with a little more than half of the solution. Shake lightly to remove bubbles air. Press a second basin into the mixture and load it with a couple of bricks. Wait 1-2 days for the concrete to harden.

Remove the resulting bowl from the improvised form. It will serve as the base and reservoir of the fountain.

To make a medium and small bowl, repeat the procedure with a slight difference: when the concrete hardens a little, cut a hole in the bottom with a piece of pipe. Then you pass the pump hose through it.

With a hacksaw, cut a piece of the sewer pipe lengthwise and glue scotch tape. At the bottom, on the opposite side, make a cutout so that the pipe will pass through.

Cut a small piece of the water pipe and connect it to the main one using an angle fitting, wrapping the joints with electrical tape.
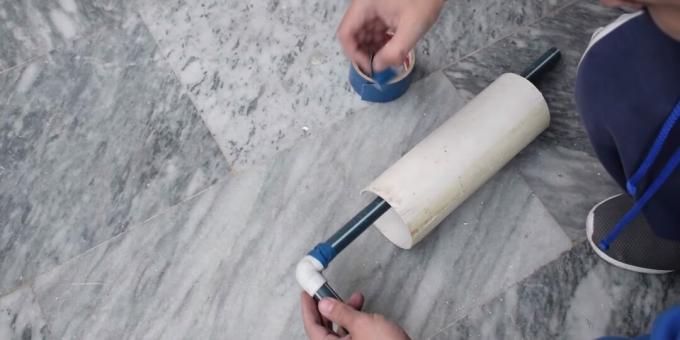
Insert the resulting structure into the sewer pipe and fill with mortar.

When the concrete has hardened, cut the tape on the mold, open it and remove it.

Put on the middle bowl on top, put the cut and glued with tape sewer pipe with a smaller diameter and fill it with mortar.

After the concrete has hardened, carefully remove the mold, having previously cut it.
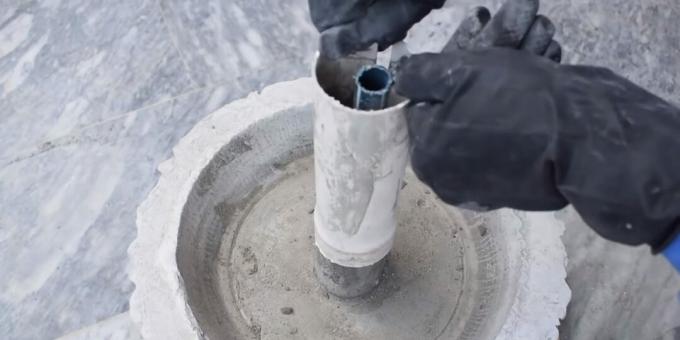
Install the top, smallest bowl. Mark the protruding part of the pipe with a marker and cut off the excess with a hacksaw.
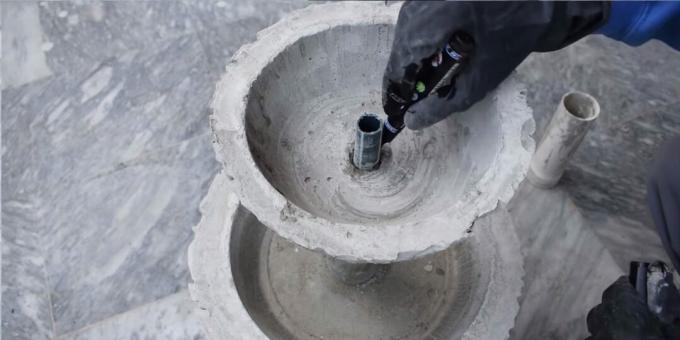
Place the base of the fountain in its place and place the remaining two bowls on the stand in it. Paint the structure with moisture resistant paint.

Connect the pump to the fountain tube, fill it with water and turn it on. Add decor as desired.
How to make a concrete water lily fountain with a pond

Difficult to manufacture, but beautiful fountain. The structure is installed on a concrete base, for example, in the yard or on the site near gazebos.
What is needed
- Trowel (trowel);
- putty knife;
- knife;
- scissors for metal;
- bricks;
- sand;
- cement;
- water;
- a piece of chalk;
- a piece of expanded polystyrene (foam);
- film;
- thick cardboard or oilcloth;
- rectangular shaped pipes;
- brush;
- reinforcement mesh;
- wire.
How to do
Draw with chalk a circle with a radius of 60 cm. It is most convenient to use a piece of cord or a stick of a suitable length and act like a compass. Install bricks around the perimeter, forming the side of the pond from them.

Pour sand inside. Smooth and compact with a trowel.

Prepare a solution by mixing 1 part of cement and 1 part of sand and diluting with water until thick sour cream. Pour it to the bottom and smooth it well.
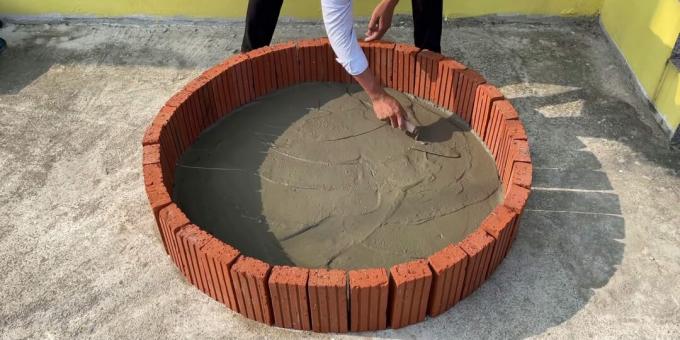
After a day, when the concrete hardens, coat the sides with fresh mortar on all sides, leaving a hole for the tube in one place. Smooth the surface and make it textured by rubbing with a piece of styrofoam soaked in water.
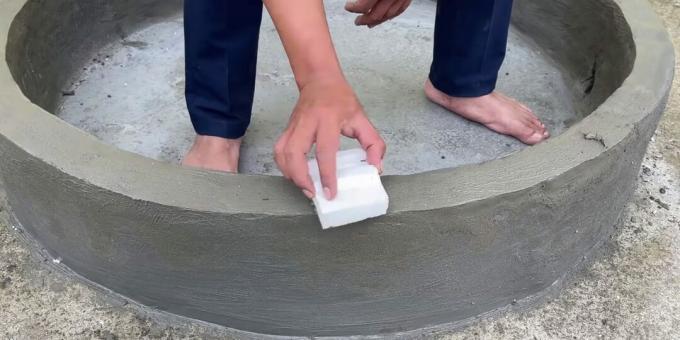
Lightly dampen the outside wall with water and stick on some mortar to make the top of the bead thicker. Cut off excess with a knife.

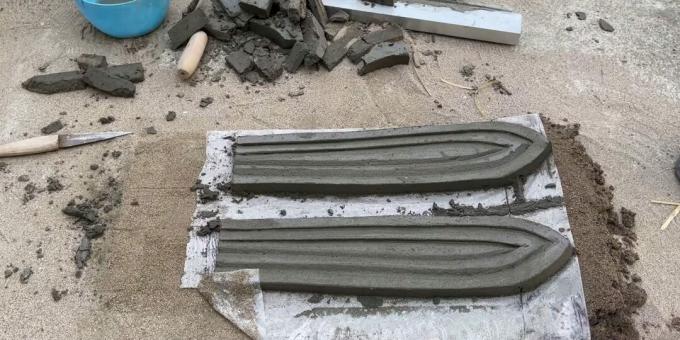
While the structure is solidifying, make the walls of the central part of the fountain in the form of a water lily. To do this, lay a film on the floor and lay out two wide profile pipes at the edges and one narrow one in the center. Place a cement-sand mortar between them. Instead of pipes, you can use wooden blocks of a suitable size, which it is advisable to wrap with foil to make the parts smooth.

Smooth out the solution and after 30 minutes, when it hardens a little, attach a homemade template made of thick cardboard or oilcloth. Circle it to outline the contours of the petals of the future water lily.

Use a knife to cut the edges of the petals, adding details.

Cut off any excess and brush with a brush dipped in water to smooth the surface.

Drag the blanks along with the film onto the sand slide to give the tips a slightly curved shape. Let them freeze in this position. Repeat the procedure and make 10 of these petals.
Sprinkle sand on the floor, smooth and compact with a trowel. Form a circle of standing bricks using an inverted basin as a template. Then lower the stones by laying them flat.

Add a couple more bricks to make stacks of three, and build a flower of petals inside the circle.

Pour the solution to the bottom and drown in it the steel wire coiled in rings, which will serve as reinforcement.

Cover the inner surface flower solution. After half an hour, make a hole in the center of the bottom with a piece of pipe.

After all the inner joints of the petals are smeared with a solution, move on to the outer ones.

Cut triangles from the reinforcement mesh to the size of the petals, bend them slightly and apply the mortar over the top. Smooth the surface with a brush dampened in water.

Place a brick support in the center of the pond and place the pump and hose inside.

Using the low basin as a mold, cast a concrete round lid for the support on which the fountain flower will later be mounted. Remember to leave a hole for the hose.

When the lid is cured, cover the support with it and place it on top water lily.

Insert a tube into the hole in the side of the pond and cover it with mortar. If necessary, it will be possible to drain the water from the fountain through the hole.

Decorate the bottom with small stones. Draw another circle around the pond, dividing it in two and leaving passages on the sides. Spread bricks around the perimeter.

Fill the resulting flower beds with soil and plant the plants. Pour water into the pond, run fish and add decor to your liking.
Read also🔧🔨💪
- How to make a garden path yourself
- 9 ways to make a hammock with your own hands
- How to make beautiful flower beds with your own hands: 55 inspiring photos + instructions
- How to make a smokehouse with your own hands
- 12 garden care products from AliExpress and other stores
The authoritative scientific journal Nature wrote about the safety and effectiveness of "Sputnik V"
Scientists have shown a prototype of a protective mask that can test for coronavirus
What is coronavirus revaccination and why is it needed? Answered the main questions

