How to Compress Twisted Pair: A Step-by-Step Guide
Miscellaneous / / May 08, 2021
Just follow the instructions and you will succeed.
1. Understand the basics
Twisted pair is a cable for connecting devices on a local network. Inside it has eight multi-colored conductors, which are twisted together in pairs. There is an 8P8C connector at each end of the cable. Yes, yes, not RJ ‑ 45, namely 8P8C - this is the correct name for the plugs that we insert into the router and computer.
The wires inside the connectors are arranged in a certain sequence depending on the standard - now T568A or T568B are relevant. In this case, the order of the conductors in the plugs on both sides can be either the same (straight cable) or different (crossover cable). The first connect the passive and active devices, for example, a computer and a router, and the second - two passive ones, for example a pair of computers.
It is easy to get confused in all this, but do not rush to get scared: strict adherence to such rules was relevant many years ago. Now ports in all relatively modern devices are able to automatically recognize the type of connection and adapt to it. So it doesn't matter which cable or circuit you use, everything will work.
Most often, a straight cable is used - so as not to get confused - and the T568B standard, as more relevant. We recommend that you do just that.
The only exceptions are PoE devices, such as cameras, which are powered over a twisted pair cable. With a different order of the conductors at the ends of the cable, they will not be able to work.
2. Prepare everything you need
Here's what you need:
- cable;
- connectors 8P8C;
- nippers or scissors;
- flat head screwdriver.
It is advisable to take the plugs with a margin - in case it does not work out the first time. The crimping itself is performed with a special tool - a crimper. But for one-time use, it makes no sense to buy it. After all, you can easily get by with improvised means, such as a flat screwdriver or knife.
3. Remove the outer jacket from the cable

Cut a piece of twisted pair to the required length and carefully peel off 2–3 cm of outer insulation from both ends. It must not be cut through to the end, so as not to damage the veins. To do this, take scissors, squeeze them slightly and twist them around the axis of the cable. Then simply peel off the incised shell with your hands.
Do not strip too much: if the insulation does not go inside the connector, it will not fit well on the cable and contact may break over time.
4. Align and trim the veins
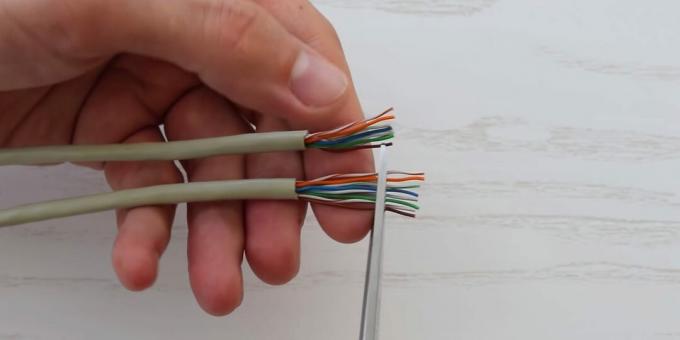
Cut off the nylon thread that runs next to the veins so that it does not get in the way. Unwind the pairs conductors, straighten them and line up. Now, with wire cutters or scissors, cut the veins a few millimeters so that they are all the same length.
5. Arrange the conductors in the correct order
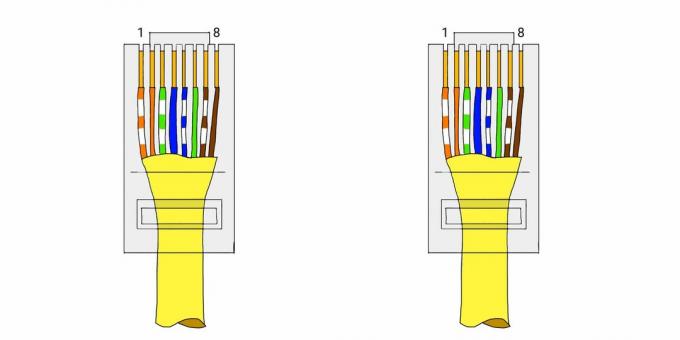
As agreed, we will use a T568B direct crimp. Focusing on the diagram, arrange all the cores in the desired sequence. The white-orange conductor should go first, and the brown one should go last. And so on both ends cable.
6. Put on the connector
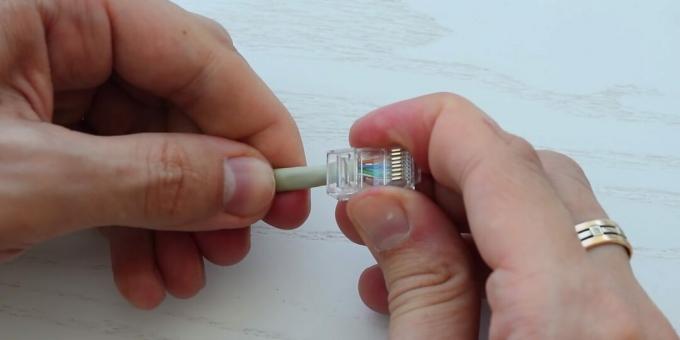
Turn the plug over with the latch tongue down. Take it so that the side where the cable is inserted is facing you, and insert the conductors into the space provided for them. You do not need to clean them beforehand.
Make sure that the wires enter all the way and do not get tangled in the process. Please note: for a reliable connection, the connector must include not only conductors, but also 8-10 mm of the outer sheath.
7. Fasten the connector
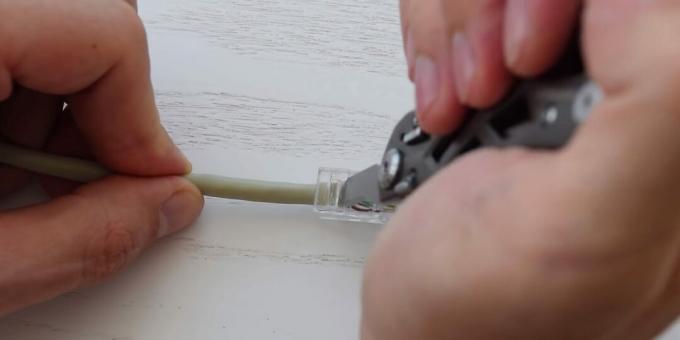
Next, you need to fix the plug, which is needed so that the cable does not inadvertently pull out and you do not stay without Internet. This can be done later, but it is better not to postpone it: this does not have to hold the cores during crimping.
To do this, turn the plug with the contacts up and place it on a table or other hard surface. Make sure the outer shell fits slightly deeper than the retainer. If not, pull out the wire and shorten the wires a little. Use a screwdriver to press down on the small tab in the recess at the edge of the connector to press down on the cable.
8. Crimp
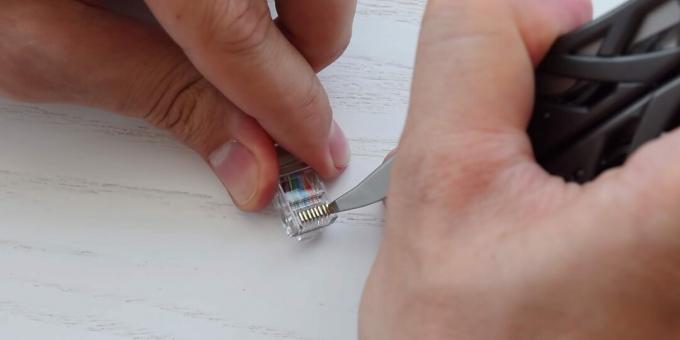
Now is the time to crimp the connector. If you have a crimper, you just need to insert it into the tool and press the handle. We will act somewhat differently. But this method is not much more complicated.
Support the plug with your hand without turning it over. Take a flat-head screwdriver and use force (but not excessive force) to alternately push all the contacts. You will feel how they will give in and lower a little, cutting through the insulation of the wires and securing them.
Correctly crimped contacts should be flush with the surface of the plug - they should be slightly recessed into it. Otherwise, the connector will fit tightly into the connector.
9. Check cable operation
It remains to connect with our twisted pair router and a computer (or other devices) and check if there is an Internet connection. If everything is done correctly, then the LEDs on the connectors of the devices will blink and a connection will appear in a couple of seconds.
If the cable does not work, try pressing the contacts again - it is possible that some of them are not fully seated. Also, be sure to check that the wires in the connector are in the correct sequence. If they are confused, cut off the plug and crimp again.
Read also💿⚙️💻
- How to connect a second monitor to a computer
- How to connect a camera to a computer
- How to connect a computer to a TV
- How to connect wired and wireless headphones to your computer
- How do I connect my phone to a TV with a wire?
A photo of New York with a resolution of 120,000 megapixels has been published. Can you find a naked person on it?
Eldorado and M.Video sell MacBook Air with M1 and 16 GB of RAM at a discount of 8,280 rubles
Citylink sells Leatherman and Victorinox multitools. Selected 10 lucrative offers

