How to fix CPU Fan Error when booting your computer
Educational Program Technologies / / December 28, 2020
A black screen with an incomprehensible inscription instead of the usual Windows window is scary, but the problem is solved quite simply.
What does CPU Fan Error mean?
The full description of such a problem looks like CPU Fan Error! Press F1 to Resume or CPU Fan Error! Press F1 to Run SETUP. As you might guess from the name, the computer's self-diagnosis system reports a CPU cooling fan error and prompts you to continue or run the settings.
Basically, you can press F1 to boot the system and work normally. But you should only do this if you are sure that everything is in order with the cooling and there is no risk of overheating the processor.
What Causes the CPU Fan Error
Before and while the computer is running, BIOS monitors voltage and other hardware parameters, including fan speed. The efficiency of the latter is determined by their speed.
Error CPU Fan Error! appears in cases when the system detects low fan speeds or their complete absence. Without active cooling CPU will overheat quickly, so the user is warned about it.
How to fix CPU Fan Error
1. Make sure the fan is spinning
Look inside the system unit, or better, carefully remove the side cover on the left side and check the rotation of the processor fan.
If the cooler is not spinning, then something is probably interfering with it. Most often, the rotation of the blades is blocked by wires hanging from the power supply or a large accumulation of dust.
The solution is simple and straightforward: to tie up the cables with plastic ties, and dust - remove compressed air and a brush. If the fan is heavily soiled, it may be necessary to remove it by unscrewing the screws or snapping off the clips. All this must be done, of course, when the computer is turned off.
2. Check if the connection is correct
If the fan is clean and easily spins by hand, but does not rotate while the PC is running, most likely it is not properly connected to the connector on the motherboard.
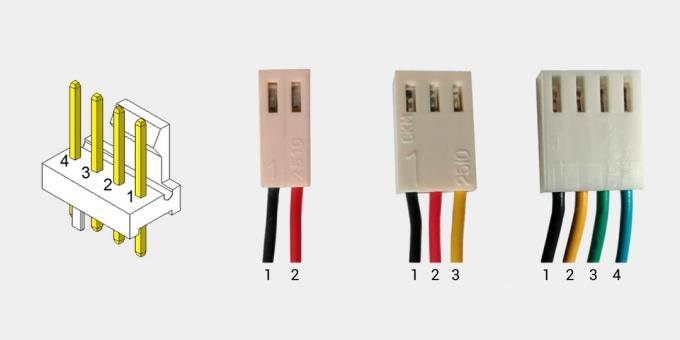
The connector has a special key that prevents it from being inserted into the intended place incorrectly. And yet, out of ignorance or inattention, this can be done. Especially if you connect a fan with three wires.
Sometimes users get confused and connect the cooler to the wrong connector. There are several of them on the board, and the processor fan must be connected to the one designated as CPU_FAN. It is easy to confuse it with a nearby CHA_FANwhich is actually for a case cooler.

In both cases, you just need to insert the plug into the correct connector and so that the grooves on the connectors match. The next time you turn it on, everything will work as it should.
3. Increase fan speed

IN BIOS settings you can change the rotational speed of the cooler. And the error CPU Fan Error! often appears if the RPM is set too low. The system simply assumes that the fan is not spinning.
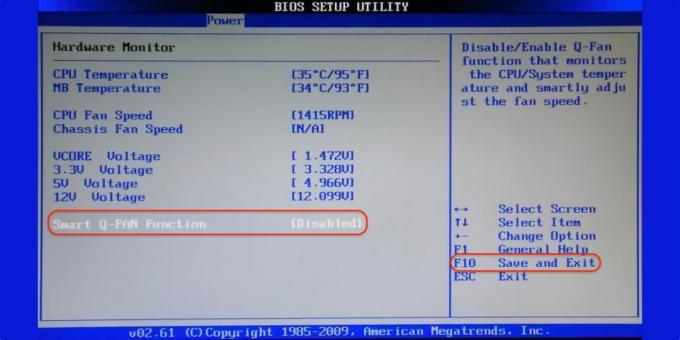
If you have changed these settings, you must turn off the Smart Q-FAN speed control function and press F10 to save. You can also choose the speed at which the error will not appear. To do this, you need to gradually increase the speed, save the parameters and reboot for verification.
4. Replace fan

In very rare cases, the lack of rotation can be caused by a breakdown of the cooler itself. You can check its performance by applying a voltage from 5 to 12 volts to the connector. Most convenient to use battery "Krona" or four AA cells connected in series.
To do this, the “minus” of the battery is connected to the connector pin number 1 (black wire), and “plus” is connected to the pin number 2 (red or yellow wire). If the fan does not turn on, you will have to replace it with a new one.
5. Disable RPM tracking
If the cooler is connected to a different connector on the motherboard or you deliberately reduced its speed in order to to achieve silent operation - you can disable the rotation control function and, accordingly, get rid of annoying mistake. It is worth doing this only if you understand the risk of overheating or separately control the temperature using additional software like SpeedFan.

To do this, find the CPU FAN Fail Warning option in the BIOS and disable it by setting the value to Disabled or Ignored, and then save the settings and reboot a computer. In some motherboards it may be called CPU FAN Speed or a little differently, but about the same in meaning.
Read also🖥💽🔧
- How to reset BIOS and reanimate your computer
- What to do if your computer's USB ports don't work
- What to do if the Internet is lost on Windows
- What to do if your Windows computer slows down
- How to recover a hard drive


