As laid paving slabs with their hands
Do It Yourself Educational Program / / December 19, 2019
1. Prepare tools and materials
For laying paving slabs will need the following:
- tiles and borders;
- rubble and sand;
- cement and trowel;
- water and a bucket;
- level and a rule;
- measuring tape and a pencil;
- pegs and cord;
- rubber hammer and tamping;
- angle grinder with a diamond wheel;
- rake and shovel;
- watering and broom;
- UD-profiles for drywall or steel pipe;
- geotextiles - on request.
2. Think about the layout

Depending on the form of tiles, there are many schemes for different stacking patterns. As a rule, all producers supply their products such information, so you should not have a problem with the selection scheme.
Do not forget that the more complex the shape and pattern of paving slab to be produced, the greater complexity and more undercut. If you want to simplify the work, choose a tile of a rectangular or square shape, and tracks and sites do with straight lines. Ideally, all paving the area under the correct dimensions of the whole number of tiles to do without the undercut.
3. Make markup

- Calculate the width of the future track, folding number of tiles in a row. Do not forget to include the thickness of the borders and add 5-10 cm on both sides.
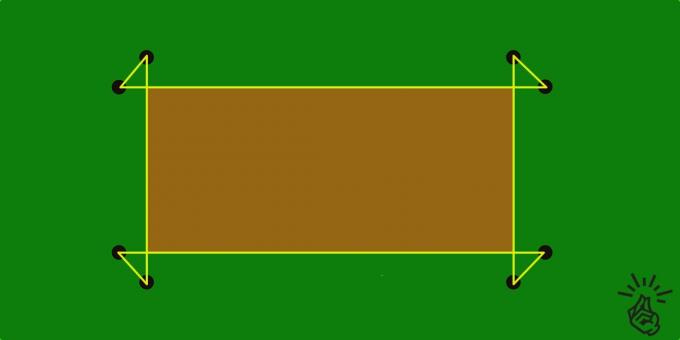
- Measure the desired distance with a tape measure and mark with the help of wooden or metal stakes area laying paving slabs. They do not interfere, use of two pins on each corner and drive in them at a distance of 20-30 cm.
- Pull the cord between the pegs and draw the perimeter of the work area.
- Check the diagonal of the resulting rectangle and make sure they are the same. If the distances are different, achieve the exact size by moving the pegs.
4. Prepare the base

- If the earth is old paint, remove it.
- Carefully remove shovel fertile soil. Usually it is 30-40 cm.
- Make sure that all the roots of the grass and removed to seed not grow through the tile.
- Align the soil rake and well compacted it over the entire area of the trench rammer manually.
- For draining of water from the surface of the tile shape on one side of the trench slope rate of 1 cm per linear meter.
5. Install curbs

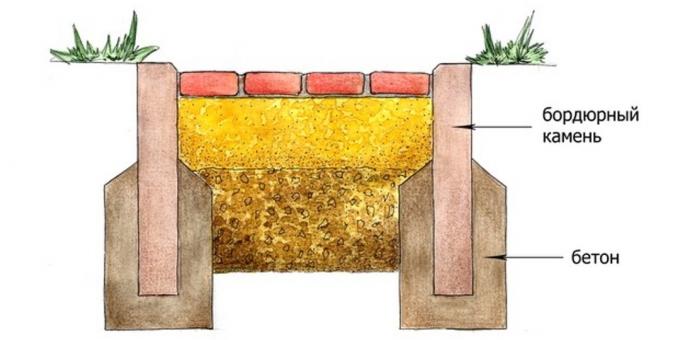
Paving tiles - this is a relatively mobile coverage, so the edges are always installed paving curbs. They are not allowed to crawl due to ground heave. For fixing the borders themselves they are placed on the concrete. The height of the curb may be either above the tiles and flush with its surface.
- Dig a shovel small trench width slightly larger border on both sides of the site.
- Prepare a mixture of such calculation: 1 bucket of cement, 3 of sand buckets and the buckets 2 rubble. Add some water to the solution it was thick and did not spread.
- Put the solution in a trench and put on top of the curbs.
- Stones face down on the concrete, tapping a rubber mallet, and align it with the cord to the desired height.
- Wait a day, while the material hardens.
6. Make pillow

Paving slabs laid on the concentrated good pillow. For garden paths and pedestrian areas enough sand, driveways and parking garage to further amplify the rubble layer. Also, gravel cushion is used at a high level of ground water, acting as a drainage and preventing swelling. Sometimes, for greater strength and protection against root penetration between ground and bedding are laid geotextile.
How to make a pillow for the pedestrian walkway
- Lay on the compacted soil geotextile (optional).
- Pour sand into the trench, and moisten it with water.
- Good sealed with tamping to form a layer of 15-20 cm.
- At sufficient density of the sand will not remain traces of shoes.
How to make a pillow for the site under the car
- Lay on the compacted soil geotextile (optional).
- Align the bottom of the trench with a thin layer of sand and tamp thoroughly.
- Pour rubble middle fraction and compact to obtain a layer of 20-25 cm.
- To spill on top of the sand, to moisten and tamp layer about 5 cm.
7. Prepare and align the cement-sand mixture beacons

- Knead dry cement-sand mixture (DSP) of this calculation: 1 bucket of cement to sand buckets 5-6.
- Set by the level of beacons UD-profiles or pipes for plasterboard. Form slope of 1 cm to 1 m for water drainage.
- Fill layer DSP height of 2-4 cm between beacons and smooth out by a rule.
- In the formation of pits spiked missing amount of mixture and contractible along the guides, until the surface is flat.
- Carefully remove the beacons and fill voids formed GCHQ.
8. Lay paving tiles

- Begin laying the paving slabs on the angle, which is the most viewed, and from the lowest point in the presence of a natural slope in the area.
- Install the tiles by yourself to avoid stepping on the prepared surface.
- Place the bricks in its place, tightly reining and shoving each other with a rubber mallet.
- Level check to the horizontal plane is flat.
- If any tile is below the rest, take it off and make backfill bit DSP.
- If there is undercut, first lay all the whole paving, and then saw out pieces of angle grinders desired shape and mount them.
9. fill seams

- Carefully sweep up the rest after laying trash.
- Profusely spill paved surface weak water pressure and allow to dry.
- Sprinkle tile dry mixture to which it was packed, and well drive in all joints with a gap between the borders using a broom or a broom. Remove excess.
- Pour seams weak water pressure, and after drying, again, pour DSP.
- If necessary, repeat the procedure until the complete filling of joints.
10. pour curbs

The final touch - bedding outer sides of the curbs soil. Carefully fill the trench the ground, level rake and compact tamper. If necessary, overseeding grass lawn to recover.
see also👷♂️🚧🛠
- How to make your own hands arbor
- The seal inflatable and frame pools
- How to align the wall: For detailed instructions,
- How to style wall tiles
- How to lay tiles on the floor


